How to Create a Facebook Page for your Craft Business
Affiliate Disclosure: As an Amazon Associate I earn from qualifying purchases. Additionally, I may get commissions for purchases made through other affiliate links in this post.
Ready to get your new business out to the world? A great place to start is Facebook. It is against Facebook’s terms and conditions to use your personal account to represent something other than yourself. Instead, you’ll need to create a Facebook Page. It’s important to note that you must have a personal Facebook account to create a Page. Here is a step-by-step tutorial to create your Page:
1) Log into your Facebook account.
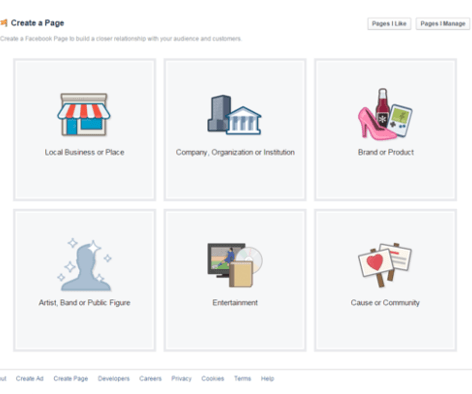
2) From the blue bar at the top of the page, click the down arrow on the far right hand side, then choose “Create Page”.
3) Choose the category for your business page. If you do not have a storefront that the public can come shop at (most Silhouette and Cricut crafters do not) do not choose Local Business or Place. You’ll most likely want to choose “Company, Business, or Institution” then “Retail and Consumer Merchandise”, “Company”, or “Small Business”. Alternatively, if you only sell one product or one product line, you could choose “Brand or Product”, then the category of your product. After choosing your category, enter the name of your small business.
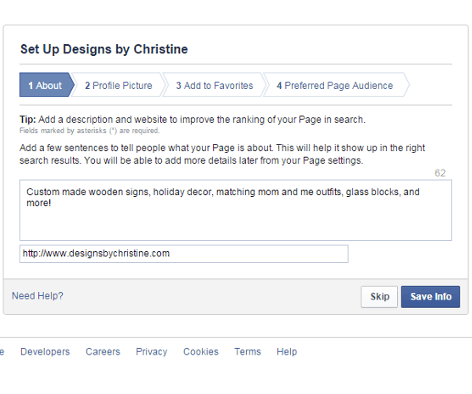
4) Next enter a short description of your page, and your website address (if you have one) and click “Save”.
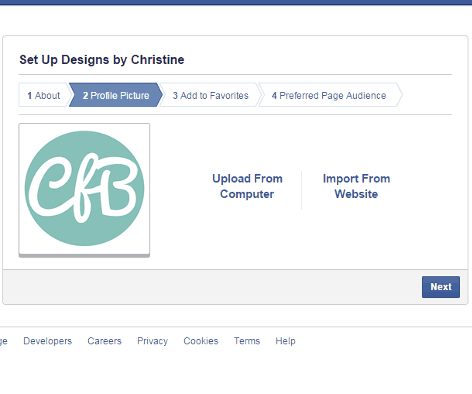
5) Now, you’ll need a profile photo for your page. I suggest you upload your business logo. If you do not have a logo, put a picture of one of your recent creations, and plan to update it.
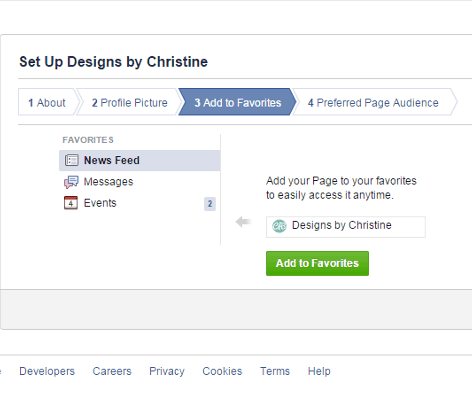
6) Add your page to your Facebook favorites to make it easy for you to find.
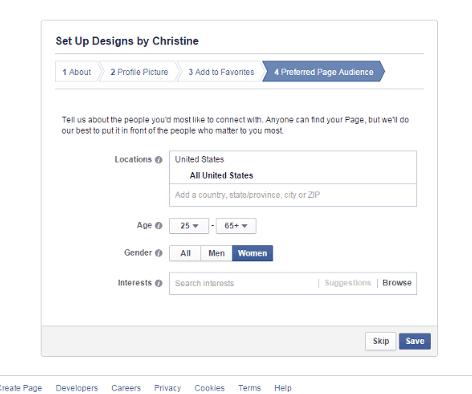
7) Now, you’ll need to choose some specifics about people who may like, or may buy, your items. I chose United States, as I currently plan to only ship to the US. I also selected women, since most of my products are “girly” or geared towards women. You can then select interests based on your items by using the “Browse” link. For example, if you create pet item, you’ll want to select people that like animals. Click “Save” when you are ready to move forward.
8) You are almost finished. Next, you’ll want to like your new page and begin posting. Facebook will also prompt you to share your new page with your friends (optional).

9) Lastly, add a cover photo (photos of some recently created items are a great idea!) to your profile by clicking “Add Cover” in the top left hand corner. This feature works the same as adding a cover photo to your personal Facebook page. If you don’t have a photo ready to go, I suggest you head over to pagemodo.com or canva.com and create one. Both sites are free and easy to use with a drag and drop editors to help you create a cover photo.
That’s it! Congratulations on your new Facebook Page! The key to having a successful Facebook Business Page is gaining new likes, and posting regularly. Read more about social media on Cutting for Business.
Share this post on Pinterest:
Since 2015, Christine Schinagl has been helping crafters start and run craft businesses through her blog, Cutting for Business. As a Silhouette and Cricut crafter herself, she has a unique take on what works and what doesn’t work in the craft business world. She also enjoys teaching other crafters how to create digital SVG designs, available through the Design with Me series.