• Home
  • Work with CfB
  • Contact
    • Bloglovin
    • Facebook
    • Instagram
    • Pinterest

Cutting for Business

  • New? Start Here!
  • Buy My Books
  • Must Have Products
  • Join the Insider’s Club
  • Etsy Shop
  • Free Cut Files
  • Free Etsy Listings


Affiliate links may be present in the following article. For my full disclosure policy, see this link.
Additionally, as an Amazon Associate I earn from qualifying purchases.

Design Tutorial: Text Cut Out Designs in Silhouette Studio

Filed Under: Silhouette Studio Tutorials

It’s about time for another design tutorial, don’t you think? Today, we are going to look at creating cut out text designs in Silhouette Studio. Cut out designs are easy enough for a beginning Silhouette user to create and look great on a number of products, so let’s go!

Here’s a few examples of cut out designs that I’ve shared on the blog before – and they’ve all been popular:

  • Free Bring on Vacation SVG Cut File
  • Free Easter Bunny SVG Cut File
  • Free You & Me Valentine’s Day SVG
  • Free ‘Oh Deer’ SVG Cut File
  • Free Minivans are Cool SVG Cut File for Silhouette or Cricut
  • Free Commercial Use “You Are My Sunshine” Cut File for Silhouette or Cricut

Cut Out Designs in Silhouette Studio Tutorial

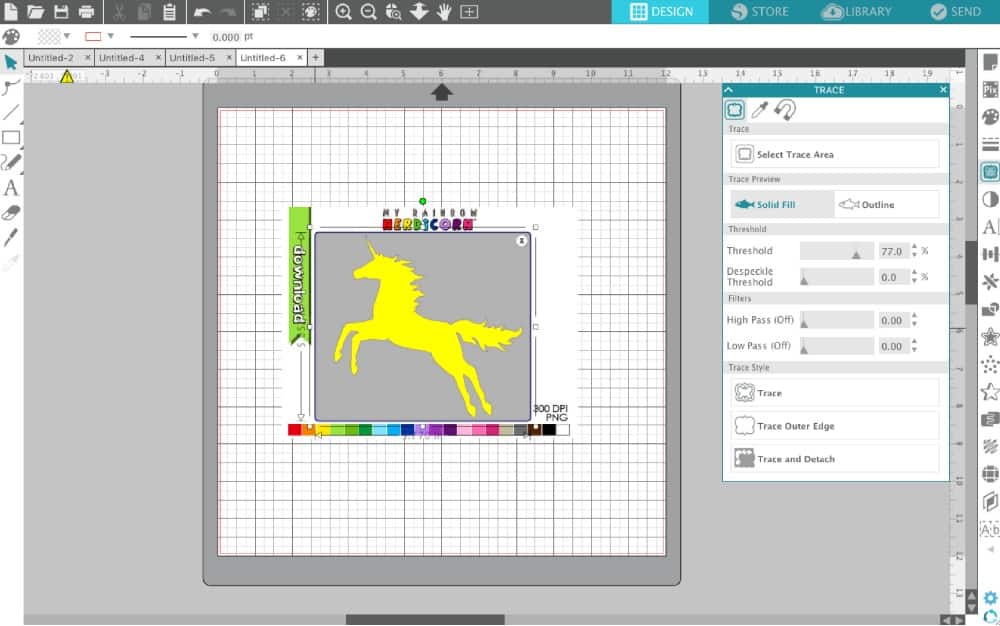
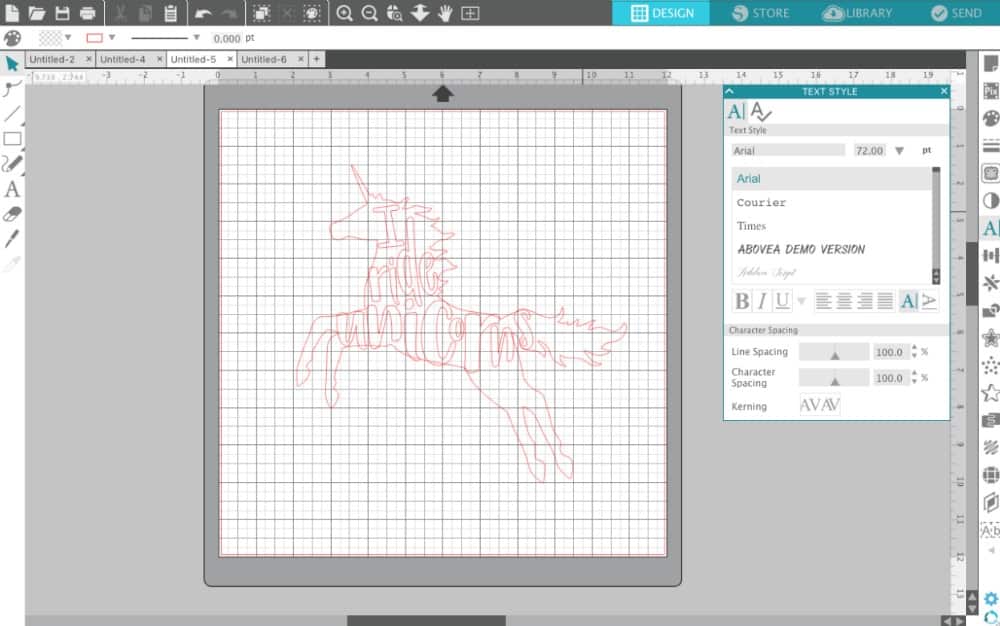
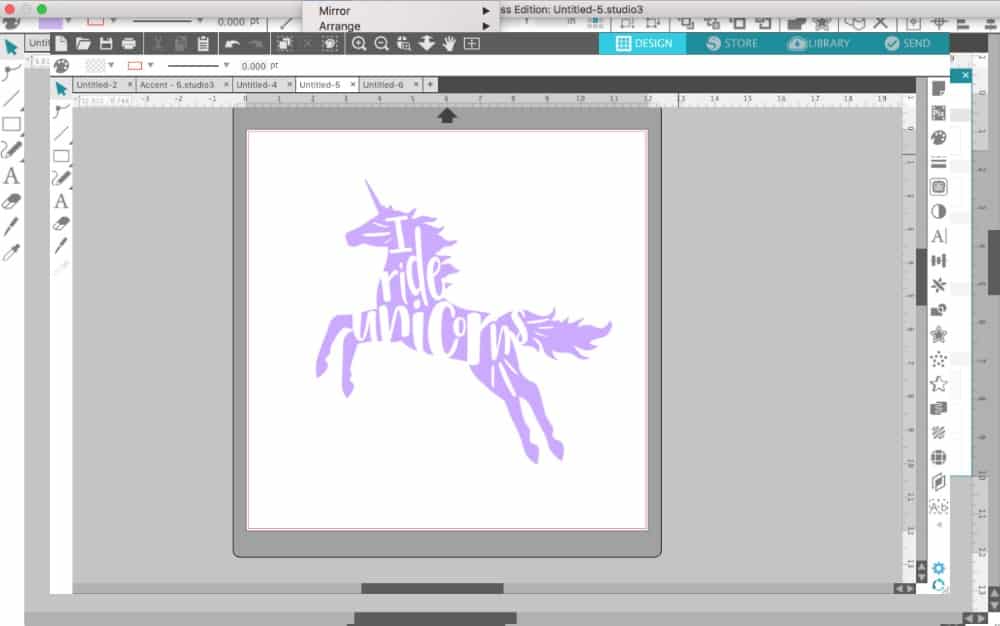
  1. Start by finding a commercial use clipart design that you can trace. For this tutorial, I chose a free, commercial use unicorn image. When looking for images, find ones that have enough space for text and that are easily recognizable when cut in one color.
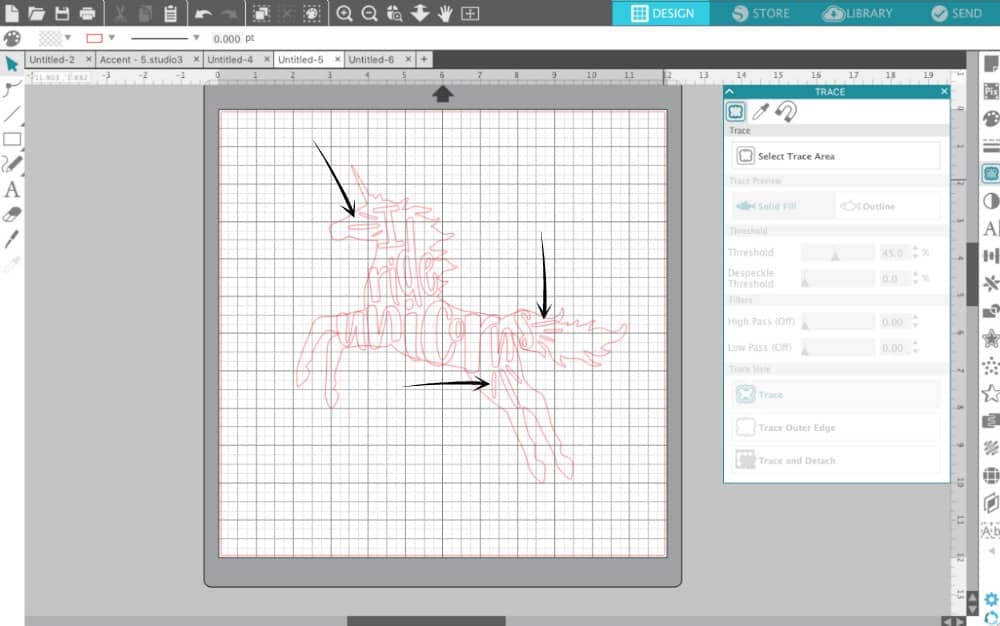
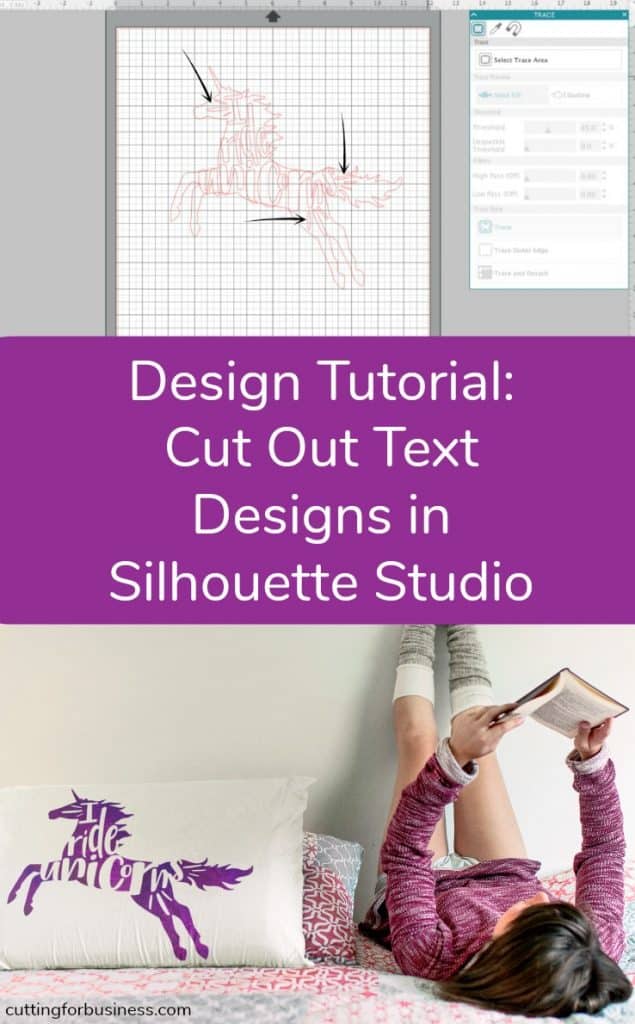
  2. Trace the unicorn design. In Silhouette Studio version 4, you’d use the “Trace” panel. Delete the original image once you’ve got the trace. Design Tutorial: Text Cut Out Designs in Silhouette Studio - by cuttingforbusiness.com
  3. Choose a font and type out the text to put in your design. For this tutorial, I chose Camica font and the words “I ride unicorns”. Design Tutorial: Text Cut Out Designs in Silhouette Studio - by cuttingforbusiness.com
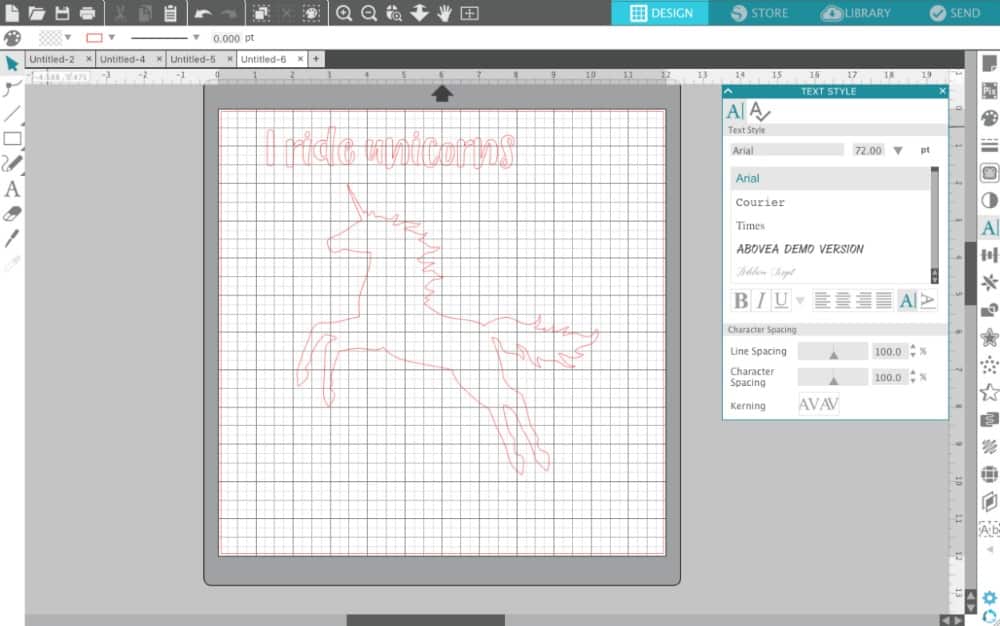
  4. Right click the text and select “Ungroup”. This will leave you with each letter separated from the rest. Design Tutorial: Text Cut Out Designs in Silhouette Studio - by cuttingforbusiness.com
  5. Now, drag each letter to where you want it. The goal will be to cover most of the shape with the text. I like to let my letters overlap the shape a bit, but that is your choice. Design Tutorial: Text Cut Out Designs in Silhouette Studio - by cuttingforbusiness.com
  6. After your letters are arranged, select all the letters and group them together. In Silhouette Studio version 4, you’d right click and select “Group”.
  7. Now, we have to deal with the empty space in the design. To fill it in a little more, I just add some flourishes, dashes, and so on. I first drew one shape using the Smooth Drawing Tool (pencil icon, left side), then copy and pasted it and resized it to make more. Design Tutorial: Text Cut Out Designs in Silhouette Studio - by cuttingforbusiness.com
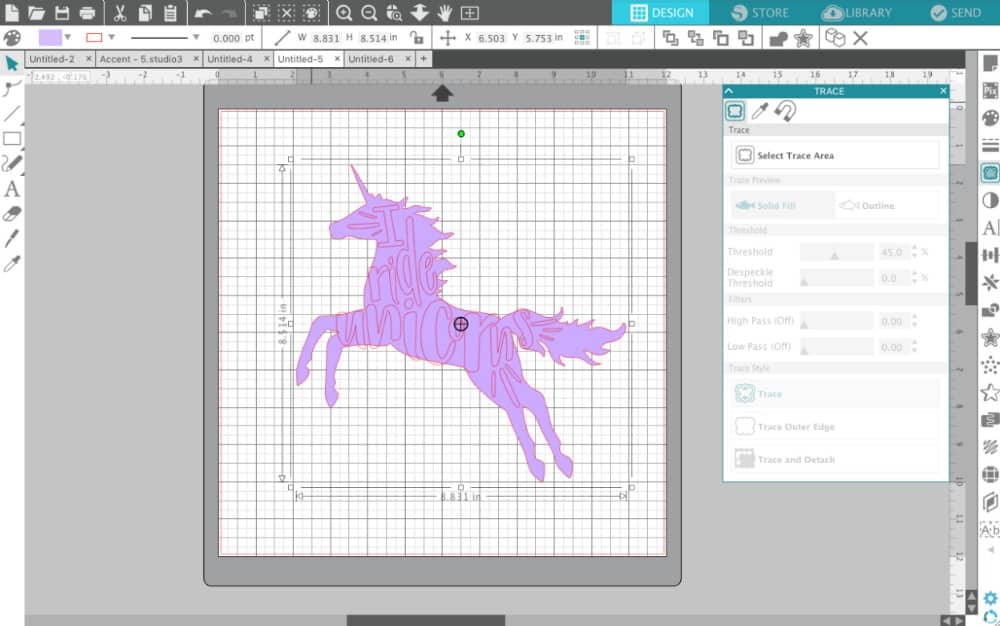
  8. Now, I like to turn my picture a solid color. Choose any color and fill in your traced image. Design Tutorial: Text Cut Out Designs in Silhouette Studio - by cuttingforbusiness.com
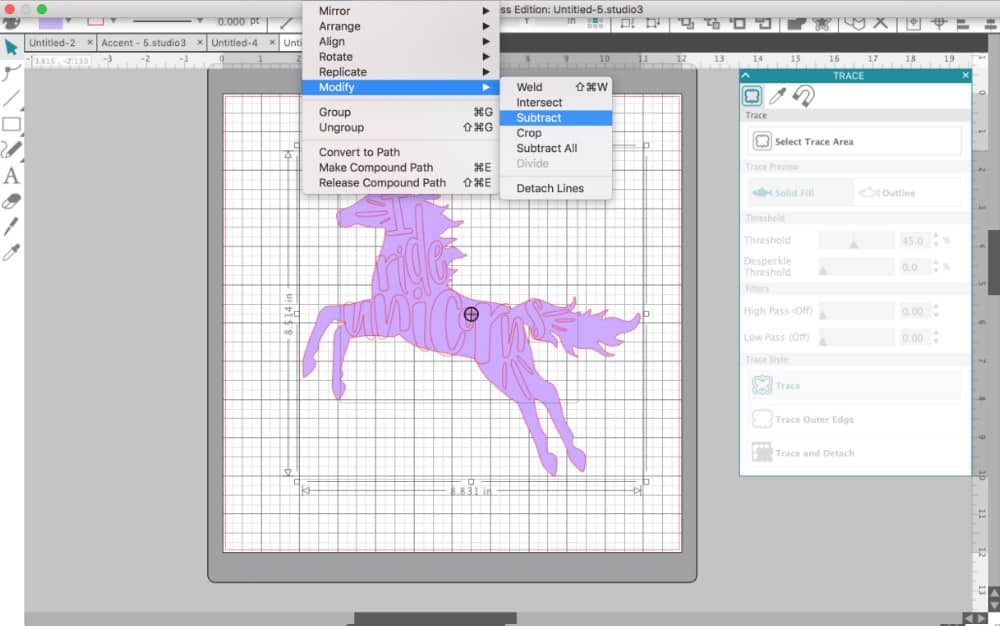
  9. Last, select the text and subtract it from the image. In Silhouette Studio 4, you’d select, “Object”, “Modify”, “Subtract”. Design Tutorial: Text Cut Out Designs in Silhouette Studio - by cuttingforbusiness.com
  10. That’s it! Here’s what the finished design looks like: Design Tutorial: Text Cut Out Designs in Silhouette Studio - by cuttingforbusiness.com
    Or, here’s the design in holographic heat transfer material:Design Tutorial: Text Cut Out Designs in Silhouette Studio - by cuttingforbusiness.com

Now, get out there and try it yourself! Remember, unique designs pay off!

Download the file I created in this tutorial – free with commercial use license included at this link in .studio3 format.

No time to design right now? Save this post to Pinterest and come back to it later:

Design Tutorial: Text Cut Out Designs in Silhouette Studio - by cuttingforbusiness.com

Related Posts

  • Tutorial: How to Create Semi Custom Designs Using KitsTutorial: How to Create Semi Custom Designs Using Kits
  • Tutorial: How to Make Cut Files with Dingbat FontsTutorial: How to Make Cut Files with Dingbat Fonts
  • 2 Ways to Thicken Fonts in Silhouette Studio2 Ways to Thicken Fonts in Silhouette Studio
  • How to Convert .studio or .studio3 to .svg from Silhouette Studio + Free Cut FileHow to Convert .studio or .studio3 to .svg from Silhouette Studio + Free Cut File
  • Design with Me: Two Color Repeating Text DesignsDesign with Me: Two Color Repeating Text Designs
  • Design Tutorial: Working with Text in Silhouette StudioDesign Tutorial: Working with Text in Silhouette Studio

Connect with Cutting for Business

  • Bloglovin
  • Facebook
  • Instagram
  • Pinterest

Get Cutting for Business in Your Inbox

Buy Books


Cutting for Business is a participant in the Amazon Services LLC Associates Program, an affiliate advertising program designed to provide a means for sites to earn advertising fees by advertising and linking to Amazon.com and affiliated sites. See the disclosures page for full disclosure information.


« Tutorial: Facebook Cover Videos
Where to Order Custom Printed Leggings »

Comments

  1. Jerri says

    June 25, 2017 at 10:51 am

    Thank you for the new tutorial with Studio version 4. I can always count on you to help when I’m unsure of the next step!

    Reply
    • Christine says

      June 25, 2017 at 12:44 pm

      My pleasure! I love V4 so far!

      Reply
  2. T Minaya says

    June 26, 2017 at 3:06 pm

    Excelent article. Thank you so much.

    Reply
    • Christine says

      June 27, 2017 at 2:01 pm

      Always happy to write ones like this!

      Reply
  3. Jenn Valente says

    October 9, 2017 at 7:38 pm

    Ok, I am so annoyed with my silhouette I almost want to throw it through the window.
    I am trying to make a onesie for my niece that says wild flower. was able to do everything, the spacing of the letters and lines so i could use the littlest vinyl as possible. Nothing is cutting. I traced the words after I wrote it out using cooper black font which comes with the softwear. Do i not need to trace the font in order to cut it out of the vinyl? When do i need to use the trace tool? And a lot of the tutorials i am find (PS i love the way you explain everything) seem to be based of the old software, my portrait is 3 months old and uses the 4 softwear, there isnt a thickness option in send (there is a force button, do i just use my thickness settings there?) There is also not an option for cutting heat transfer vinyl? and also when I go to cut i can either cut or cut the edge, whats the difference?
    like in your tutorial if i had just pressed cut edge would only the unicorn have been cut out not the words in the middle? I thought i was figuring it out ( i got a design to cut out of freezer paper using velium) made one good cut and now nothing is working..

    Reply
    • Christine says

      October 11, 2017 at 12:22 pm

      Hello! No, you wouldn’t trace the words, you would just type them. You use tracing when you are creating a cut path in a picture. The heat transfer vinyl setting on a Silhouette is “Heat Transfer, Smooth”. Perhaps check to make sure your blade is seated correctly.

      Reply

Comments on Cutting for Business are moderated before posting. This ensures that this blog does not get overrun by spam or inappropriate comments. Please allow up to 7 days before you'll see your comment. Thanks, Christine

Leave a Reply Cancel reply

Your email address will not be published. Required fields are marked *

Make Money

Love to craft and ready to make some money? You're in the right place! Whether you own a Silhouette Cameo, a Cricut Maker, a Silhouette Curio, or a Silhouette Mint, get tips and tricks to make an income with your machine.


Love My TSI - lovemytsi.com


Free Fonts

Copyright © 2019 · Cutting for Business
Disclosures · Privacy Policy
This site is not affiliated with Silhouette America or Cricut (Provo Craft & Novelty, Inc.)

This website uses cookies to improve your experience. We'll assume you're ok with this, but you can opt-out if you wish. Cookie settingsACCEPT
Privacy & Cookies Policy

Privacy Overview

This website uses cookies to improve your experience while you navigate through the website. Out of these cookies, the cookies that are categorized as necessary are stored on your browser as they are essential for the working of basic functionalities of the website. We also use third-party cookies that help us analyze and understand how you use this website. These cookies will be stored in your browser only with your consent. You also have the option to opt-out of these cookies. But opting out of some of these cookies may have an effect on your browsing experience.

Necessary Always Enabled

Necessary cookies are absolutely essential for the website to function properly. This category only includes cookies that ensures basic functionalities and security features of the website. These cookies do not store any personal information.

Non-necessary

Any cookies that may not be particularly necessary for the website to function and is used specifically to collect user personal data via analytics, ads, other embedded contents are termed as non-necessary cookies. It is mandatory to procure user consent prior to running these cookies on your website.