• Home
  • Work with CfB
  • Contact
    • Bloglovin
    • Facebook
    • Instagram
    • Pinterest

Cutting for Business

  • New? Start Here!
  • Buy My Books
  • Must Have Products
  • Join the Insider’s Club
  • Etsy Shop
  • Free Cut Files
  • Free Etsy Listings


Affiliate links may be present in the following article. For my full disclosure policy, see this link.
Additionally, as an Amazon Associate I earn from qualifying purchases.

Step by Step Guide to Hosting a Sign Party

Filed Under: Shows, Fairs, Classes, Markets, and More

Today, I’ve got a special guest on Cutting for Business! Welcome Sarah Strunk – a longtime blog reader and owner of Simply Sarah. She’s sharing her method of hosting sign painting parties with her Silhouette Cameo (or Cricut). After you read this post, pick up her new ebook with more information about hosting a party with your Silhouette at this link. I’ll let her take over:

I’ve known for a long time I wanted to do sign parties. I love those paint your own canvas nights, but lets be honest, I’m not great at freehand – that’s why I have a Silhouette! I knew parties to paint stuff I ACTUALLY wanted to hang on my walls would be a great idea. Logistically though, how was I going to pull it off? A few months ago I finally just decided to grab my closest girlfriends and give it a spin. If it was awful they wouldn’t hate me and I needed a easy group to practice on. Definitely do a few trial runs!

Pricing

  • I charge $40 per person, but am raising the party rates to $45 per person.
  • It costs me $10 per board for each person. That figure does not include time – the prep work is fairly labor intensive, but when you love what you do it doesn’t really feel like work!

Sign Ups­

  • I create a Facebook Event. Then, add the people who want to come and post a picture of what you’ll be making. Make a demo yourself, don’t do a mock up. You want to be able to see how long it takes you to make it and you want to have an example at the party. Get everyone signed up and collect payment UP FRONT.
  • Make payments non refundable or tell them it’s non refundable but can be applied to a future party if they need to cancel.
  • When signing up, I got everyone’s last names and established dates.

Prep Work

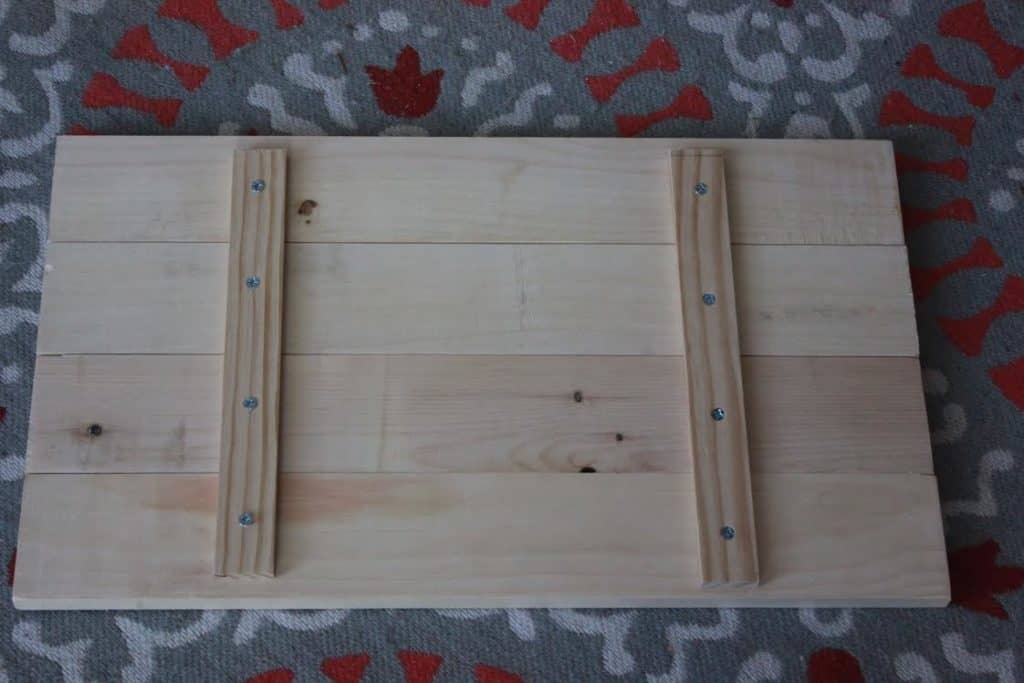
  • Head to Lowe’s, Home Depot, or Menards and grab 1×4’s in pine. (Alternatively, you could use pallets but I don’t have patience for that and wanted them to take stain/paint easily.)
  • I cut the boards down into 24 inch pieces so that I could easily just cut 12×24 sheets for the stencil.
  • I then planked them together making 12×24 inch plank boards. I just used strips that I also found in the wood department at Lowes and cut those down. I used 1 1⁄2 in screws on the boards.
  • It takes me an hour or 2 to plank 10 boards. That includes cutting, sanding, and planking. TIP: Don’t offer varying sizes. The process goes quickly because you’re doing all one size.
  • Alternative: Instead of planks for your first sign, you could buy larger wood planks and cut them down. I did that for my first few parties and it was great!
    Step by Step Guide to Hosting a Paint Your Own Sign Party with your Silhouette Cameo or Cricut - by cuttingforbusiness.com

Creating the Stencil­

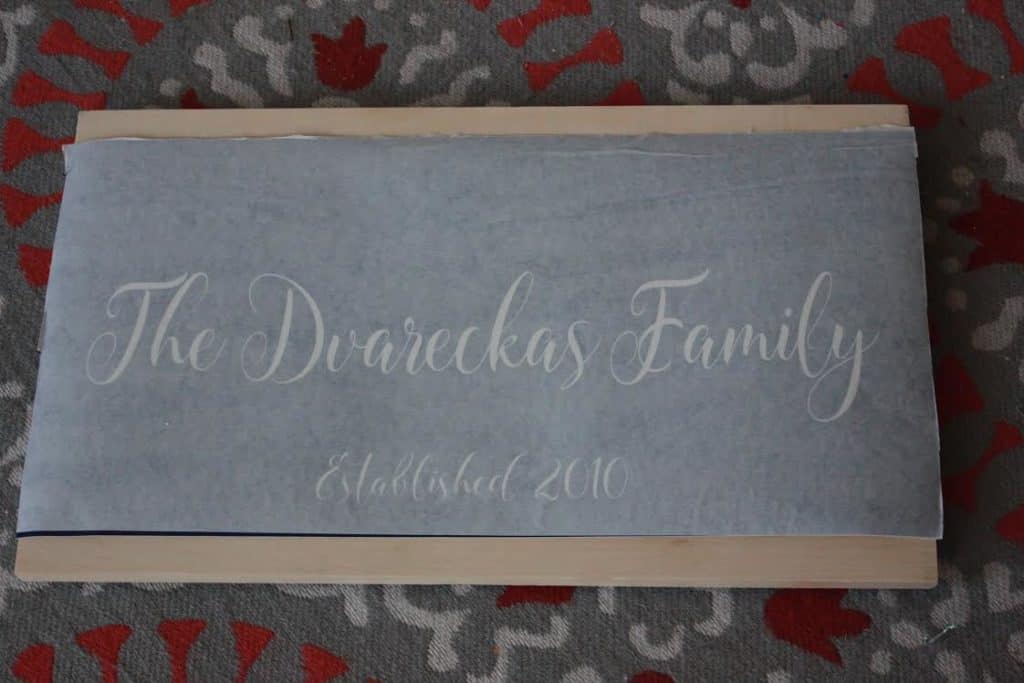
  • I created a stencil in 2 parts, using Oracal 631 vinyl. The first stencil was the big last initial. Then, I made a stencil of each person’s last names. Cut each last name on a single 12×24 sheet. This is easy for them to line up on their board and everything will be centered.
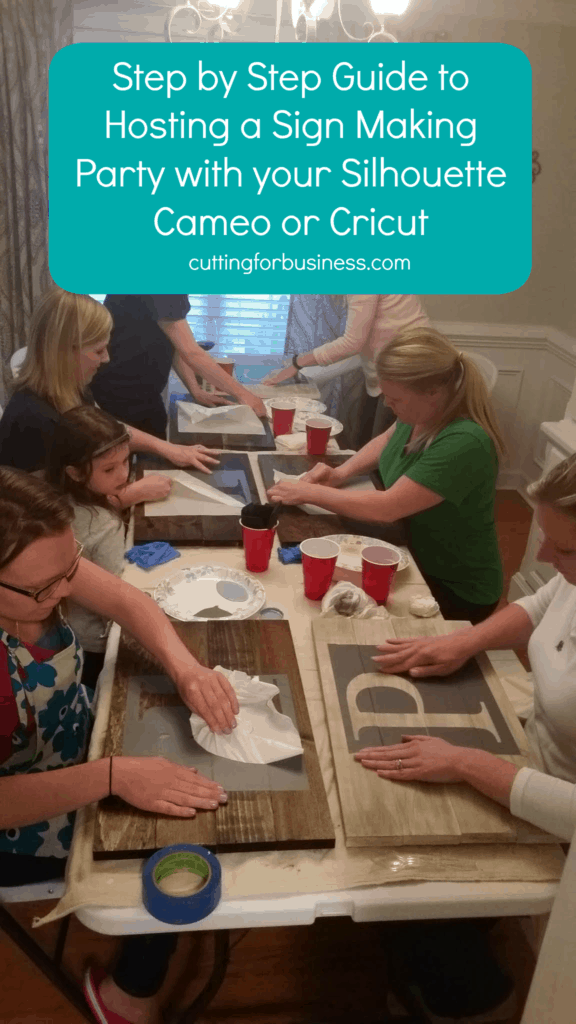
 Step by Step Guide to Hosting a Paint Your Own Sign Party with your Silhouette Cameo or Cricut - by cuttingforbusiness.com

Party Day

  • Set up folding tables or your own tables and lay down drop clothes. Purchase foam brushes, burnishing squeegees, exacto knives, staining sponges, rags, and paper plates (for paint).
  • I highly recommend hosting the party at your own house, that way you have everything you need. I did a few parties at the hostesses’ home and it was chaotic and I always was forgetting something.

At the Party

  • I had each person bring a snack and I provided wine (you can also do BYOB). You’ll need something to do while you wait for paint to dry – that’s why you need snacks and drinks!
  • After everyone visited for a bit we sat down to start the signs.
  • I offered 3 stain options: Gray, dark walnut, and a whitewash technique with antiquing glaze on top. At my last party, most picked the dark walnut with two opting for the whitewash. I poured some stain into little cups and had staining sponges I got from Lowes. Be sure to watch everyone as they put on the stain so it doesn’t go on too heavy or it won’t dry. I went by everyone after they stained and wiped off excess with a paper towel. I then helped the whitewash folks get their first coats done. I had a hair dryer on hand to help with drying times but we didn’t need it. After about 30 minutes, everyone’s boards felt dry so we moved on.
  • We then laid down the last initial, You can just show everyone how to peel their stencil from the backing paper and then lay it down on the board, have painters tape and a ruler handy as it will help attendees center theirs on their board. You then want to show everyone how to smooth out the bumps, and make sure all the edges are down really well. I double checked each person’s board to make sure the stencils had a good seal.
  • Then we took foam brushes and sponged on our paint in light coats! I use Waverly brand chalk paint (available at walmart and less than $6 a jar, it goes far, and dries fast).
  • Next, take a break to let the first coat of paint dry. Chat, snack, and drink!
  • Once they letters are dry, you’re ready to go do the final step and put the family name. You’ll give everyone their stencil and you may need to help to apply it. If you have any more than 6 people you may want to have a helper to help those get stencils down and peel off transfer tape. Then, attendees will lightly sponge on their color and then peel off the stencils right away. You don’t want any of the base color coming up, so don’t leave the stencil on more than maybe 10 to 15 minutes.
  • Help everyone with any minor touchups. When you’re doing plank boards you may get slight bleeding around the planks, but you can go by with an exacto knife and scrap it and it will lift right off without messing up the stain or paint underneath.

You did it! Don’t forget to take a picture at the end. That picture is how you will get people to sign up for more parties! A note on hostesses: I find that you do not need to offer any sort of hostess reward but you can. Generally, I have no problem booking parties. In my opinion, providing hostess rewards is something that is popular with a lot of direct sale companies to help get people “in the door”.

Step by Step Guide to Hosting a Paint Your Own Sign Party with your Silhouette Cameo or Cricut - by cuttingforbusiness.com

A huge thank you to Sarah for stopping in to share her “secrets”! Please thank Sarah for stopping in by visiting her website Simply Sarah or picking up her new book. I’ve got a few other home party posts that you can read here. As always, if you loved this post, pin it or share it on Facebook by hovering over the image below or tapping it on mobile.

Step by Step Guide to Hosting a Paint Your Own Sign Party with your Silhouette Cameo or Cricut - by cuttingforbusiness.com

Related Posts

  • How to Host a Craft Holiday Market in Your HomeHow to Host a Craft Holiday Market in Your Home
  • How to Host a Workshop with Your Silhouette CameoHow to Host a Workshop with Your Silhouette Cameo
  • How to Host an At-Home Party with Your Silhouette or CricutHow to Host an At-Home Party with Your Silhouette or Cricut
  • How to Host a Christmas Ornament Making PartyHow to Host a Christmas Ornament Making Party
  • New Book: 15 Home Parties to Host with Your Silhouette or CricutNew Book: 15 Home Parties to Host with Your Silhouette or Cricut
  • Free eBook: How to Start a Website with Wix for Your Silhouette or Cricut BusinessFree eBook: How to Start a Website with Wix for Your Silhouette or Cricut Business

Connect with Cutting for Business

  • Bloglovin
  • Facebook
  • Instagram
  • Pinterest

Get Cutting for Business in Your Inbox

Buy Books


Cutting for Business is a participant in the Amazon Services LLC Associates Program, an affiliate advertising program designed to provide a means for sites to earn advertising fees by advertising and linking to Amazon.com and affiliated sites. See the disclosures page for full disclosure information.


« Why I won’t be using Pattern by Etsy
Free Silhouette Junkie Cut File for Cameo »

Comments

  1. Amy Pelzner says

    April 19, 2016 at 8:54 pm

    Wow, what a great idea! I love the sign making party, thanks for sharing!

    Reply
    • Christine says

      April 20, 2016 at 10:31 pm

      Glad you enjoyed it Amy!

      Reply
      • Maura says

        April 2, 2017 at 3:28 pm

        Hi Christine. Do you reside your contact or transfer paper? I feel like that may make it more cost effective. Just checking! Thanks

        Reply
        • Christine says

          April 3, 2017 at 8:42 am

          I do not reuse it. Too much hassle!

          Reply
    • Sarah says

      January 12, 2018 at 2:24 pm

      Hi Christine,
      How do you go about collecting money before the party?

      Reply
      • Christine says

        January 13, 2018 at 9:01 am

        You usually collect payment at signup.

        Reply
  2. Michelle says

    May 5, 2016 at 7:51 pm

    How would you hang these?

    Reply
    • Christine says

      May 5, 2016 at 10:27 pm

      Hi Michelle! To hang wooden signs, you can use a sawtooth hanger (two if it’s a large piece) or a picture hanging wire kit. Both are a few dollars at your local hardware store. Hope that helps! (I deleted your duplicate question on another post.) Christine

      Reply
    • Lisa says

      January 17, 2017 at 12:44 pm

      I use command strips ….the kind that you use to hang pictures. They remind me of Velcro. There are ones that hold up to 16lbs but I weighed my board and it only weighed 2lbs.

      Reply
      • Christine says

        January 19, 2017 at 7:52 am

        Thanks for sharing!

        Reply
    • Crystal says

      February 11, 2017 at 5:14 pm

      Did the vinyl stick well, even though the stain was put on just before? Was it dry enough? I am having a party and thought about staining and painting the boards ahead of time and having the party attendees put them together there. Just afraid the stain won’t be dry enough …. thoughts?

      Reply
      • Christine says

        February 12, 2017 at 8:28 am

        A water based stain allows it to dry fast enough to do during a party. Hope that helps!

        Reply
        • Sophie says

          February 15, 2017 at 11:02 pm

          Would you recommend an outdoor stain then? Or any water base stain.

          Reply
          • Christine says

            February 16, 2017 at 7:23 am

            Any water based stain.

  3. Amanda Sagen says

    May 12, 2016 at 7:59 pm

    What do you use to transfer the vinyl? I can’t seem to find a product that doesn’t just pull the vinyl right back up off the wood sign.
    Thank you!

    Reply
    • Christine says

      May 13, 2016 at 7:55 am

      I use Greenstar transfer tape for nearly all projects: http://amzn.to/1NsWw57. Hope that helps!

      Reply
      • Amanda Sagen says

        May 13, 2016 at 6:46 pm

        Thank you! I will check that out.

        Reply
        • Christine says

          May 15, 2016 at 8:50 pm

          🙂

          Reply
    • Lisa says

      January 17, 2017 at 12:46 pm

      I use clear shelf liner. I’ve used the Cricut transfer and it doesn’t work at all….too sticky.

      Reply
      • Christine says

        January 19, 2017 at 7:52 am

        Thanks for sharing!

        Reply
        • Tammy says

          November 19, 2017 at 3:15 pm

          I am having a problem with my paint coming up when i take the stencil off, that is the paint I painted the board with.

          Reply
          • Christine says

            November 26, 2017 at 11:15 am

            Hi Tammy! Oramask 813 can help with paint peeling up, and be sure to remove the stencil against the wood grain.

      • BILLIE jo says

        January 22, 2017 at 8:46 pm

        I’m glad you said u used the shelf paper…..I was wondering if that would work.

        Reply
        • Katherine says

          February 26, 2017 at 9:35 am

          What do you guys mean by shelf liner? Like the adhesive stuff for drawers and cupboards?

          Reply
  4. Corlyn Miller says

    May 15, 2016 at 3:48 pm

    Love the idea of a sign party! Thank you for sharing! How do you store the vinyl after removing it from the mat and prior to the party?

    Reply
    • Christine says

      May 15, 2016 at 8:42 pm

      You can store them in a large envelope or box until you need them since they still have the paper backing on them until sign party attendees apply them. Thanks! Christine

      Reply
  5. Sally says

    May 18, 2016 at 12:48 pm

    Hi,
    I am offering all quotes in my shop at 50% ~ If you would like to share with your customers.
    Sally

    Reply
    • Christine says

      May 18, 2016 at 1:25 pm

      Hi Sally! Feel free to view this page with information on promoting your shop on Cutting for Business. What might work for you is sharing an exclusive cut file or a social media takeover day. Thanks! (Link: https://cuttingforbusiness.com/media-kit/)

      Reply
  6. Carolyn Noland says

    June 6, 2016 at 6:58 pm

    This is exactly what I’ve been wanting to make. I’m new to my Cricut machine. Could you possibly tell me how you created the stencil? Whenever I “cut” out on my cricut, it does not leave all parts of the letter – for example – the “triangle” in a A

    Reply
    • Christine says

      June 7, 2016 at 9:29 am

      Hi Carolyn! There’s two things you can do: 1) Use a different font – for example, a stencil font. 2) When weeding your design, just be sure to not lose the small pieces like the inside of the A, O, D, P, etc. When you use transfer paper to place the design, you’ll move all the small pieces as well. After painting, remove the centers. Hope that helps!

      Reply
      • Carolyn Noland says

        June 7, 2016 at 9:37 am

        Thank you so much for your response! I will experiment with these ideas 🙂

        Reply
        • Christine says

          June 8, 2016 at 9:17 am

          Good luck Carolyn!

          Reply
  7. Maria C says

    June 17, 2016 at 7:52 pm

    Such a great idea! I can’t wait to make one? What kind of stain do you use???

    Reply
    • Christine says

      June 18, 2016 at 11:49 am

      Hello! You would use interior wood stain, found at any hardware store in the paint section. Hope that helps!

      Reply
      • B M says

        August 23, 2017 at 10:20 am

        And this stain you said is water based and will dry in time during the party for the customer to finish their sign? Do you use anything to help with the “bleed?”

        Reply
        • Christine says

          August 24, 2017 at 9:30 am

          Yes, water based stains tend to dry faster than oil based stains. Learn how to prevent bleeding: https://cuttingforbusiness.com/2016/05/24/paint-bleed-using-vinyl-stencil/

          Reply
  8. Diana says

    June 17, 2016 at 10:41 pm

    Love these signs. I’m am the proud owner of a new silhouette cameo and I am frustrated…maybe overwhelmed.
    How did you make the stencil for the large initial??
    Would you mind sharing the type of font you used for the name?

    Reply
    • Christine says

      June 18, 2016 at 11:51 am

      Hi Diana! The stencils are cut from vinyl, I don’t know the exact font used, but most script fonts would work well. Don’t be overwhelmed – it takes time to learn.

      Reply
    • Katherine says

      February 26, 2017 at 9:38 am

      Diana, I make a lot of stencils with scrapbook paper for sign classes on my silhouette. Then they are a one time use and very easy to use. I just make sure to fill the letters in and then do cut lines to keep the centres of the letters in so o don’t have to glue those down.

      Reply
  9. Kallie says

    June 22, 2016 at 10:19 pm

    I love this! I recently got a Silhouette and just starting making some signs for my home. I work with a lot of crafty people so this would be fun to do and get together. The only thing i worry about is trying to figure out the sizing of the fonts, since some of us have long names. Any tips? Since I’m still a beginner.

    Thanks!

    Reply
    • Christine says

      June 24, 2016 at 10:25 pm

      Hi Kallie! Each person’s fonts will likely be a slightly different size when you design them. Hope that helps!

      Reply
  10. Kathleen says

    July 3, 2016 at 11:32 pm

    Any tips on cutting thin letters. My vinyl tears. I have a Silhouette Cameo.

    Reply
    • Christine says

      July 5, 2016 at 3:33 pm

      Hi Kathleen! Using the overcut setting can be really useful for thin, delicate cuts. Hope that helps!

      Reply
  11. Diana says

    July 5, 2016 at 10:54 pm

    Have you ever left the vinyl lettering on the wood? Or do you need to paint it? I made one and painted the monogram and then transfered the name directly on the wood. I’ve put 4 coats of urethane on it, now I’m wondering if the vinyl letters will come up.

    Reply
    • Christine says

      July 8, 2016 at 9:09 am

      Hi Diana! You could leave the vinyl lettering if you would like. Most customers seem to prefer the look of paint over vinyl.

      Reply
  12. Veronica Bernal says

    July 7, 2016 at 10:46 pm

    Thank you so much for this step by step, I’ve been asked from a group of Military spouses to do something like this but I needed more information on how to go about it, this was very helpful. I hope I have the opportunity to host a party with the spouses!

    Reply
    • Christine says

      July 8, 2016 at 9:05 am

      That’s great Veronica! Best of luck!

      Reply
  13. Sarah says

    July 13, 2016 at 11:06 am

    How do you know what color of paint or how many different colors of paint you should offer when making the sign. I know you offered 3 stain option but what about the initial and established date?

    Thanks

    Reply
    • Christine says

      July 14, 2016 at 8:28 pm

      I wouldn’t offer more than a handful of colors. Less than 5 is a great way to keep your costs and cleanup down.

      Reply
  14. Ginny says

    July 22, 2016 at 3:53 pm

    How much time did you allow for this party in total? Planning one of these and want to have a better idea of how long it will take. Thanks for all the insight!

    Reply
    • Christine says

      July 25, 2016 at 8:59 am

      Hi Ginny! About 2 hours.

      Reply
  15. Jessica says

    July 24, 2016 at 8:26 pm

    So I’ve been trying to make signs because I love this idea and I would love to do parties! I’m having trouble getting the vinyl to stick to the stained wood. Any tricks? I’m using a tool to rub it, but it wants to stay stuck to the transfer paper.

    Reply
    • Christine says

      July 25, 2016 at 8:59 am

      Hi Jessica! Be sure that the stain is completely dry (a day or so). Also, you can use a hair dryer to heat the vinyl up slightly to help it transfer. Hope that helps!

      Reply
      • Kristy K says

        January 9, 2017 at 10:24 am

        I hope you’re still answering questions for this post! Thank you for the great information! I am having some friends over to make signs, and I did a trial run over the weekend. The stain on my board is still not dry, after 36 hours. If your parties only take a few hours, how do you get your stain to dry quick enough for them to stain it and paint it? I used an oil-based stain. Could that be the problem?

        Reply
        • Christine says

          January 9, 2017 at 11:01 am

          Yes, you you must use a water based stain.

          Reply
  16. Jenn says

    July 30, 2016 at 1:54 am

    You mentioned your using vinyl for the stencil, can the stencil paper for cricut be used?

    Reply
    • Christine says

      July 31, 2016 at 10:06 am

      Yes, I don’t see why you couldn’t.

      Reply
  17. Jenn says

    July 30, 2016 at 12:13 pm

    How big are your fonts, for the initial and the family name

    Reply
    • Christine says

      July 31, 2016 at 10:05 am

      Hi Jenn! The size of your fonts and family name will vary with the size of your board.

      Reply
  18. Angela K. says

    August 1, 2016 at 10:15 am

    What kind of paint to you use?

    Reply
    • Christine says

      August 1, 2016 at 10:33 pm

      You can use whatever paint you’d like: acrylic, chalk, or interior flat wall paint.

      Reply
    • Christine says

      August 1, 2016 at 10:34 pm

      You can use whatever paint you like working with: acrylic, chalk, or interior flat paint all work well.

      Reply
  19. Angela K. says

    August 1, 2016 at 10:19 am

    Also, do you stain the wood for your guest, and how many designs do you let them choose from?

    Reply
    • Christine says

      August 1, 2016 at 10:35 pm

      You can choose whether you stain the wood, or have the attendee stain the wood. You’ll need to figure out if you have enough time for attendees to stain it themselves and dry. I’d limit the designs to 3 – 5 choices.

      Reply
      • Dona says

        June 27, 2017 at 11:19 am

        You are a very kind, patient lady to answer all these questions that were clearly addressed in the instructions or prior questions! 🙂

        Reply
        • Christine says

          June 27, 2017 at 2:00 pm

          Thanks Dona! Your comment made me smile! Enjoy the day!

          Reply
  20. Cindy says

    August 2, 2016 at 8:43 pm

    What is you don’t have a curcit or silhouette to print off the vinyl? What else could I use?

    Reply
    • Christine says

      August 3, 2016 at 9:20 am

      Hi Cindy! You could use an exacto knife to cut the vinyl, although this will be time consuming.

      Reply
  21. Jenn says

    August 3, 2016 at 10:28 am

    Hi
    The oracal vinyl you are using, did it come with the white transfer paper (I am seeing in photos people peeling off after placing the stencil)

    Reply
    • Christine says

      August 3, 2016 at 11:47 am

      No, you’d need to supply transfer paper/tape.

      Reply
  22. Esther Green says

    August 4, 2016 at 12:22 pm

    Hi Christine

    Why would you do differently if most of the attendees are divorced?

    Reply
    • Christine says

      August 4, 2016 at 8:35 pm

      You could create any design you would like Esther, you don’t have to use the example design.

      Reply
  23. Kirsten says

    August 6, 2016 at 10:05 am

    Hi Christine, what did the attendees use to smooth out the bubbles and make sure all the edges were secure? I’m looking for something inexpensive to keep supply cost down.

    Reply
    • Christine says

      August 8, 2016 at 10:35 pm

      A thick plastic card works or the cheap vinyl squeegees.

      Reply
      • Deb says

        July 28, 2017 at 2:46 pm

        An old gift card works very well forr this.

        Reply
        • Christine says

          July 31, 2017 at 9:03 am

          Yes. I’m not sure if that’s the most professional thing to use in a party setting though. At home, absolutely!

          Reply
  24. alma says

    September 3, 2016 at 1:13 pm

    I can not seem to get my vinyl to stick to my pallet wood or pine easily.

    Reply
    • Christine says

      September 3, 2016 at 8:02 pm

      You’ll need to sand the wood better, wash it down, and let it dry before you apply the vinyl.

      Reply
  25. Lynn Galbrecht says

    September 5, 2016 at 4:49 pm

    I am not quite following what type of vinyl you used for the monogram letter and then the family name/est. Is it tacky on one side or both and come with a peel off paper on the top?

    And both are painted on right, vinyl is just used as the stencil?

    Reply
    • Christine says

      September 5, 2016 at 5:07 pm

      Hello! You use adhesive vinyl – sticky on one side as a stencil. Vinyl is typically transferred from one surface to another with transfer tape. Hope that helps!

      Reply
  26. Crystal says

    September 12, 2016 at 2:02 pm

    Hi Christine, thank you for the awesome tutorial! I have one question. Is the “The Family Name” “established 1111” vinyl, or did they paint that also?

    Reply
    • Christine says

      September 13, 2016 at 8:00 am

      It’s paint. 🙂

      Reply
  27. Nancy says

    September 17, 2016 at 10:33 am

    Which one do you prefer, the cricuit or the silhoute?

    Reply
    • Christine says

      September 17, 2016 at 9:35 pm

      You can find my opinions in this post: https://cuttingforbusiness.com/2016/05/04/silhouette-cameo-versus-cricut-explore/

      Reply
  28. Jen Hansen says

    October 3, 2016 at 9:17 am

    How did you do the whitewash?

    Reply
    • Christine says

      October 3, 2016 at 1:36 pm

      Hi Jen! Whitewash is simply a mix of lime (Masonry lime) and water. There’s a ton of recipes online. Once you mix it up, simply use a brush or roller to put it on your project. Hope that helps!

      Reply
  29. Tracy Grass says

    October 5, 2016 at 1:08 pm

    Is the stain oil base or water base?

    Reply
    • Christine says

      October 5, 2016 at 11:46 pm

      Either will work, although water based stains dry faster than oil based stains.

      Reply
  30. Mary says

    October 19, 2016 at 1:14 pm

    You are so kind to answer all of our questions! Please pardon my ignorance but the whole transfer thing has me confused. Can you tell me when/how you add the transfer tape to the process? I assume you cut out your initials/design on the vinyl but then when is tape applied?

    Reply
    • Christine says

      October 20, 2016 at 10:01 am

      Mary, You apply transfer paper to move the adhesive vinyl from the backing paper to the wood. Hope that helps!

      Reply
  31. Maria says

    October 20, 2016 at 12:28 pm

    do you have a youtube video that we can use as a guide

    Reply
    • Christine says

      October 24, 2016 at 7:58 am

      I do not have a video.

      Reply
  32. Annette says

    October 28, 2016 at 4:02 pm

    Hi Christine, great idea..how long do you figure it takes to finish the product with approx. six people? Most people do not like doing this because they never have time to finish their craft, then it just gets put a side at home.

    Reply
    • Christine says

      October 30, 2016 at 8:59 pm

      I’d say somewhere between 2 and 3 hours is perfect!

      Reply
  33. MaryJo says

    November 1, 2016 at 11:50 pm

    This tutorial is wonderful and I did my first sign party last week! It was a huge hit! I bought pine boards and had attendees stain, let dry then put down the stencil but when we pulled the stencils(oracal 631) up some of the stain and even some of the wood came up with it. Now that I’m rereading I see where you say to not leave the stencil on longer than 10 – 15 minutes…do you think that prevents the stain from being pulled up? Most of my attendees were first time crafters and didn’t trust me when I said a little paint went a long way so I’m sure we left the stencil on longer than that, lol.

    Reply
    • Christine says

      November 8, 2016 at 9:34 am

      Congrats on your success! Yes, taking off the stencil in a timely manner helps prevent stain from pulling up. Now you’ll know for the next one!

      Reply
  34. Becky Fielder says

    November 18, 2016 at 12:16 pm

    Hi there, thank you so much for all of your wonderful tips. I do have a question for the vinyl 631. Do you de-stick it a little bit or put it on the board just as it is? I sometimes have trouble with is peeling paint or stain. Just curious what your process is for that.

    Thanks in advance,
    Becky

    Reply
    • Christine says

      November 19, 2016 at 10:17 am

      I usually don’t destick it. Be sure that your paint or stain is completely dry and remove the vinyl stencil as soon after painting as you can.

      Reply
  35. Lori says

    December 8, 2016 at 6:48 pm

    Hi, so it sounds like you cut all the stencils out before the party? I was thinking of doing a vinyl party for my daughter’s birthday and wanted to let the girls pick their fonts and designs etc, but thought this would take FOREVER for them each do it. But if it cut it out beforehand it would take 5 seconds for them to put it on whatever their item was! Ideas?

    Reply
    • Christine says

      December 9, 2016 at 8:47 pm

      Hello! Yes, I precut all of them, but didn’t weed them. If your daughter is like mine, picking out a font will definitely take all day (and probably then some!) Have you thought about doing canvas? Cut all the designs (perhaps you could theme them to your party?), have the kids weed the outside, put the design onto the canvas (for easier application, use Mod Podge on the canvas before the party), have the kids paint the canvas (over the vinyl), then after the paint is dry they remove the vinyl. They would look similar to this (not my link) – but have whatever design you created: http://justcallmechris.blogspot.com/2011/08/canvas-silhouette-updates.html. Hope that gives you an idea!

      Reply
  36. Beth Wilson says

    December 28, 2016 at 7:20 am

    When using the chalk paint, do u seal it with wax or anything else after?

    Reply
    • Christine says

      December 28, 2016 at 11:11 am

      If that’s the look you are going for, by all means, wax it – but it isn’t necessary.

      Reply
  37. Christine says

    January 2, 2017 at 7:08 pm

    Do you know of any other way to create a stencil? I don’t own one of those machines?

    Reply
    • Christine says

      January 2, 2017 at 10:01 pm

      You could print out something to trace and use an Exacto style knife on a thin plastic.

      Reply
  38. Tracy says

    January 2, 2017 at 10:49 pm

    Thanks so much for sharing! What would you think is a good minimum and maximum number of attendees for a class?

    Reply
    • Christine says

      January 4, 2017 at 11:18 am

      It depends how large your space is. I’ve taught hundreds of people down to only a handful. For larger groups, use a projector and presentation camera.

      Reply
  39. Kayeley says

    January 5, 2017 at 4:09 pm

    Hello Christine. This article is awesome! Thanks for sharing! I am wanting to start hosting sign parties, but am having trouble getting it out there for people to know about. Do you have any recommendations or how to advertise and get yourself out there?

    Reply
    • Christine says

      January 7, 2017 at 1:25 pm

      Yes, social media and word of mouth are easiest.

      Reply
  40. Linda says

    January 8, 2017 at 2:38 pm

    would 651 vinyl work for this?

    Reply
    • Christine says

      January 8, 2017 at 4:51 pm

      Yes, it would.

      Reply
  41. Laura says

    January 12, 2017 at 5:36 pm

    Do you re use the vinyl? I love making signs but usually use the vinyl directly on my signs but sometimes have trouble keeping the vinyl stuck to different surfaces I never though of using them as stencils. Do you use a different type of transfer tape? the cricut one is super sticky and sometimes takes off the stain on my wood pieces.

    Reply
    • Christine says

      January 14, 2017 at 7:59 am

      No, I don’t reuse the vinyl. I use a low tack transfer tape found here: http://amzn.to/2iTeDmZ

      Reply
  42. Angel says

    January 19, 2017 at 10:23 am

    Christine
    I am.so grateful for this article. I am planning my first party in a month or so. My question to you is, what price do you charge for people to attend/participate in these parties. I just want to make sure I cover my costs and time. Im so excited about doing them that I dont want to get so caught up in the fun of teaching people that I lose out on it. Seems the way it happens to me.
    Thank you for the helpful advice.

    Reply
    • Christine says

      January 20, 2017 at 7:51 am

      Pricing will vary depending on the materials you use. Anywhere from $20 to $50 is reasonable.

      Reply
  43. Taylor says

    February 6, 2017 at 5:13 pm

    Hi there! Loved this article. I have recently purchased a silhouette cameo and I have one issue I cannot seem to resolve. When I stain my wood and try to apply my vinyl to stencil it NEVER sticks, I’ve never had a problem with paint but with stain it will not work. Do you have any tips? Thank you

    Reply
    • Christine says

      February 7, 2017 at 9:01 am

      Are you using an oil based stain? If so, switch to a water based stain.

      Reply
  44. Janet says

    February 11, 2017 at 9:16 am

    How do you accept payments for the parties? Or what do you recommend?

    Reply
    • Christine says

      February 12, 2017 at 8:32 am

      Paypal is pretty common. It depends how you set it up.

      Reply
  45. Ari says

    February 12, 2017 at 11:11 pm

    Loved this article thank you! I’m still not understanding the transfer paper. Don’t you just use the vinyl adhesive straight onto the wood? Also, what about designing your own plastic stencils with the cameo? I have created some but am wondering if they will work properly for pallet signs. I would have to really tape them down huh? What do you think? Because I was thinking that would save money on having to keep buying vinyl.

    Reply
    • Christine says

      February 14, 2017 at 10:16 am

      Transfer paper is used to transfer the vinyl – it’s quite difficult to peel the vinyl off the backing and place it down properly. Feel free to use a plastic stencil that is taped down.

      Reply
  46. Kristy says

    March 25, 2017 at 10:39 pm

    Hello! I’ve been searching everywhere and I see you hold a class. Do you offer an online class or tutorial on how to do this? I’ve searched everywhere.

    Reply
    • Christine says

      March 28, 2017 at 12:40 pm

      Hello! Both Sarah (the guest poster) and I both have books about hosting parties. You can find Sarah’s book here: https://gumroad.com/a/517158003 or mine here: https://cuttingforbusiness.com/2017/01/23/book-host-parties-silhouette-cameo-cricut/.

      Reply
  47. Kirsten Ott says

    April 11, 2017 at 4:09 am

    I was considering doing something like this, definitely have a couple questions….do you pre-weed the vinyl? if not do you do that for the guests or have them do it?

    Reply
    • Christine says

      April 11, 2017 at 7:42 am

      Hello! Guests are usually able to weed designs themselves.

      Reply
  48. Christi McMullen says

    April 13, 2017 at 4:55 pm

    For the final size of the board is it 12 wide and 24 long? My 1×4 are a little short (3 3/8 inches) and 24 looks enormous. Do you just eyeball it? If it was true to size wouldn’t it be 16 inches x 24 inches long? Sorry for asking just don’t want to cut before I’m sure. Thanks so much for all of the tips and help.

    Reply
    • Christine says

      April 17, 2017 at 9:31 am

      You could make whatever blank board size that you want.

      Reply
  49. Kirsten ott says

    April 13, 2017 at 6:12 pm

    Also so just so I’m clear, youvsre using an adhesive vinyl to make the stencils? Adhering it to the board snd then peeling it off after painting?

    Reply
    • Christine says

      April 17, 2017 at 9:29 am

      Correct.

      Reply
  50. kirsten ott says

    April 17, 2017 at 7:39 am

    what brand of stain do you find easiest to use?

    Reply
    • Christine says

      April 17, 2017 at 9:23 am

      Any water based stain works well because they dry faster than oil based stains.

      Reply
      • Kirsten ott says

        April 17, 2017 at 11:52 am

        I’m having trouble locating one, what brand do you typically use?

        Reply
        • Christine says

          April 17, 2017 at 8:47 pm

          Minwax, with the blue banner on the front. It says “Water based”.

          Reply
  51. Andrea F. says

    April 26, 2017 at 8:16 am

    I am so looking forward to your class at the All Things Silhouette conference in June! Loved reading this tutorial because I will already understand your steps. And the class is filledl so I feel very lucky that I was able to sign up for it. I took it because I want to start making signs.

    Reply
    • Christine says

      April 26, 2017 at 11:10 am

      Awesome! Glad you got in – it did fill up fast! See you there!

      Reply
  52. wendy Jones says

    May 21, 2017 at 4:35 pm

    hi there
    I ordered your how to host a party book . I did receive it but before I could download it on my computer or even really take a look at it I have lost it. Is there anyway for it to be resent?

    Thank you so much
    Wendy Jones

    Reply
    • Christine says

      May 22, 2017 at 9:47 am

      Hello! Please email for assistance. (christine@cuttingforbusiness.com)

      Reply
  53. Britney says

    June 6, 2017 at 6:37 pm

    I have a question? Do you window the design or just leave it? I’m very new to all this and want to start making signs. I have only mad t-shirts.

    Reply
    • Christine says

      June 12, 2017 at 9:45 pm

      Hi Britney, I’m not sure what you are asking.

      Reply
  54. Meredith says

    August 1, 2017 at 1:36 pm

    I noticed in your steps that after you put on the initial you waited for it to dry and then added the vinyl stencil. Did you also paint their last names, etc or did you just use vinyl to stay on the board? I’m working on hosting a party for a charity event and I’m trying to make it the most cost effective and a fun event. If they only end up painting the Letter, then it probably will be a fast event, right? We want to let them paint their last names, etc. Thoughts? Thanks so much!

    Reply
    • Christine says

      August 2, 2017 at 6:24 pm

      Everything is painted. Thanks!

      Reply
  55. Wendy Jones says

    August 18, 2017 at 9:52 am

    What font did you use for your letter? and for the last name?

    Reply
    • Christine says

      August 20, 2017 at 9:07 pm

      Any script font works well!

      Reply
  56. Millie says

    September 19, 2017 at 2:33 pm

    What type of stain do you use at sign parties? I stained (oil based) some boards, let them dry over night but when removing the vinyl (831), it pulled off the wood and paint! Thanks!

    Reply
    • Christine says

      September 20, 2017 at 12:39 pm

      Try water based stain – it dries faster than oil based.

      Reply
  57. Lori S says

    September 21, 2017 at 11:19 am

    Hi Christine! Thanks for your awesome tutorial! Have you ever used freezer paper as your stencil? Looking for the cheapest method. Someone said you could iron freezer paper onto wood but haven’t tried it. My freezer paper ripped when I tried cutting it. Any thoughts?

    Reply
    • Christine says

      September 22, 2017 at 11:33 am

      I’ve made freezer paper shirts, but not wood. I can’t imagine that you’d be able to get a good enough seal with the freezer paper to prevent bleeding, but you could always try it out.

      Reply
  58. Sarah says

    October 11, 2017 at 10:46 am

    What type of stain do you use? Because my vinyl will not stick to stain

    Reply
    • Christine says

      October 11, 2017 at 12:17 pm

      Hello! I use a water based stain over an oil based stain.

      Reply
  59. Lisa says

    November 21, 2017 at 6:59 pm

    Hi Christine!
    I am wondering if there are copyright issues when using the Cricut designs to teach a sign painting class. Can you use any design or do you need to purchase a special commercial license? TIA!

    Reply
    • Christine says

      November 26, 2017 at 11:06 am

      Hi Lisa! You’d need to refer to the Angel Policy: https://cuttingforbusiness.com/2016/03/10/cricut-angel-policy/

      Reply
  60. Nicole says

    February 11, 2018 at 4:19 pm

    What stain do you use? I am having the hardest time finding a water base stain!!

    Reply
    • Christine says

      February 14, 2018 at 10:46 am

      I mostly use Minwax: http://amzn.to/2BtQaRk

      Reply
  61. Jaade Williams says

    July 25, 2018 at 3:31 pm

    What would you suggest to use if I would like to put a clear, glossy coating on the design after everything is finished to sort of “seal” everything in?

    Reply
    • Christine says

      September 24, 2018 at 9:45 am

      I usually don’t seal wood signs, however, you can use polycrylic: https://amzn.to/2NEIZ0c

      Reply
  62. STEPHANIE ARIZOLA says

    August 29, 2018 at 2:28 pm

    what transfer tape or contact paper do you use for this?

    Reply
    • Christine says

      September 24, 2018 at 9:50 am

      I use Greenstar: https://amzn.to/2zqAY63

      Reply
  63. Jessica says

    September 3, 2018 at 5:36 pm

    Do you seal your signs with anything after the final coat is dry?

    Reply
    • Christine says

      September 24, 2018 at 8:34 am

      I usually don’t, however you can use polycrylic. (Link: https://amzn.to/2NEIZ0c)

      Reply
  64. Robyn Dailey says

    September 14, 2018 at 11:44 am

    I went through all your comments and didn’t find an answer to my question. What happens if someone messes up? I would hold the party in my house so I guess I would go make a new stencil?

    Reply
    • Christine says

      September 24, 2018 at 8:32 am

      You’d want to have a few extra stencils on hand. However, even when I teach sign parties with hundreds of attendees – I hae yet to have anyone mess up beyond the point where I can assist them in fixing it.

      Reply
  65. Julie Farley says

    February 21, 2019 at 11:24 pm

    What is the best way to “clean up” the bleed around the edges? For example the board is stained a walnut color & was stenciled with white chalk paint. I know chalk paint is a bit more fool proof but I have never attempted the stencil & I am super nervous! Thanks!

    Reply
    • Christine, Cutting for Business says

      May 18, 2019 at 9:57 am

      Ideally, you’ll have very little bleed. I use microbrushes to touch up.

      Reply

Comments on Cutting for Business are moderated before posting. This ensures that this blog does not get overrun by spam or inappropriate comments. Please allow up to 7 days before you'll see your comment. Thanks, Christine

Leave a Reply Cancel reply

Your email address will not be published. Required fields are marked *

Make Money

Love to craft and ready to make some money? You're in the right place! Whether you own a Silhouette Cameo, a Cricut Maker, a Silhouette Curio, or a Silhouette Mint, get tips and tricks to make an income with your machine.


Love My TSI - lovemytsi.com


Free Fonts

Copyright © 2019 · Cutting for Business
Disclosures · Privacy Policy
This site is not affiliated with Silhouette America or Cricut (Provo Craft & Novelty, Inc.)

This website uses cookies to improve your experience. We'll assume you're ok with this, but you can opt-out if you wish. Cookie settingsACCEPT
Privacy & Cookies Policy

Privacy Overview

This website uses cookies to improve your experience while you navigate through the website. Out of these cookies, the cookies that are categorized as necessary are stored on your browser as they are essential for the working of basic functionalities of the website. We also use third-party cookies that help us analyze and understand how you use this website. These cookies will be stored in your browser only with your consent. You also have the option to opt-out of these cookies. But opting out of some of these cookies may have an effect on your browsing experience.

Necessary Always Enabled

Necessary cookies are absolutely essential for the website to function properly. This category only includes cookies that ensures basic functionalities and security features of the website. These cookies do not store any personal information.

Non-necessary

Any cookies that may not be particularly necessary for the website to function and is used specifically to collect user personal data via analytics, ads, other embedded contents are termed as non-necessary cookies. It is mandatory to procure user consent prior to running these cookies on your website.