• Home
  • Work with CfB
  • Contact
    • Bloglovin
    • Facebook
    • Instagram
    • Pinterest

Cutting for Business

  • New? Start Here!
  • Visit the Shop
    • Ebooks
    • Business Names
    • Craft Business Consultations
    • Order Forms
    • SVG Files
    • Etsy Shop
  • Must Have Products
  • Join the Insider’s Club
  • Etsy Shop
  • Free Cut Files
  • Free Etsy Listings


Affiliate links may be present in the following article. For my full disclosure policy, see this link.
Additionally, as an Amazon Associate I earn from qualifying purchases.

2 Ways to Thicken Fonts in Silhouette Studio

Filed Under: Silhouette Studio Tutorials

If you know anything about me beyond the Cutting for Business blog, you know that I am a softie for good fonts. Unfortunately, some of my favorite fonts are not good for cutting designs. This is usually because they are too thin to cut and weed well. Today, let’s look at two ways to thicken fonts and make them easier to cut in Silhouette Studio.

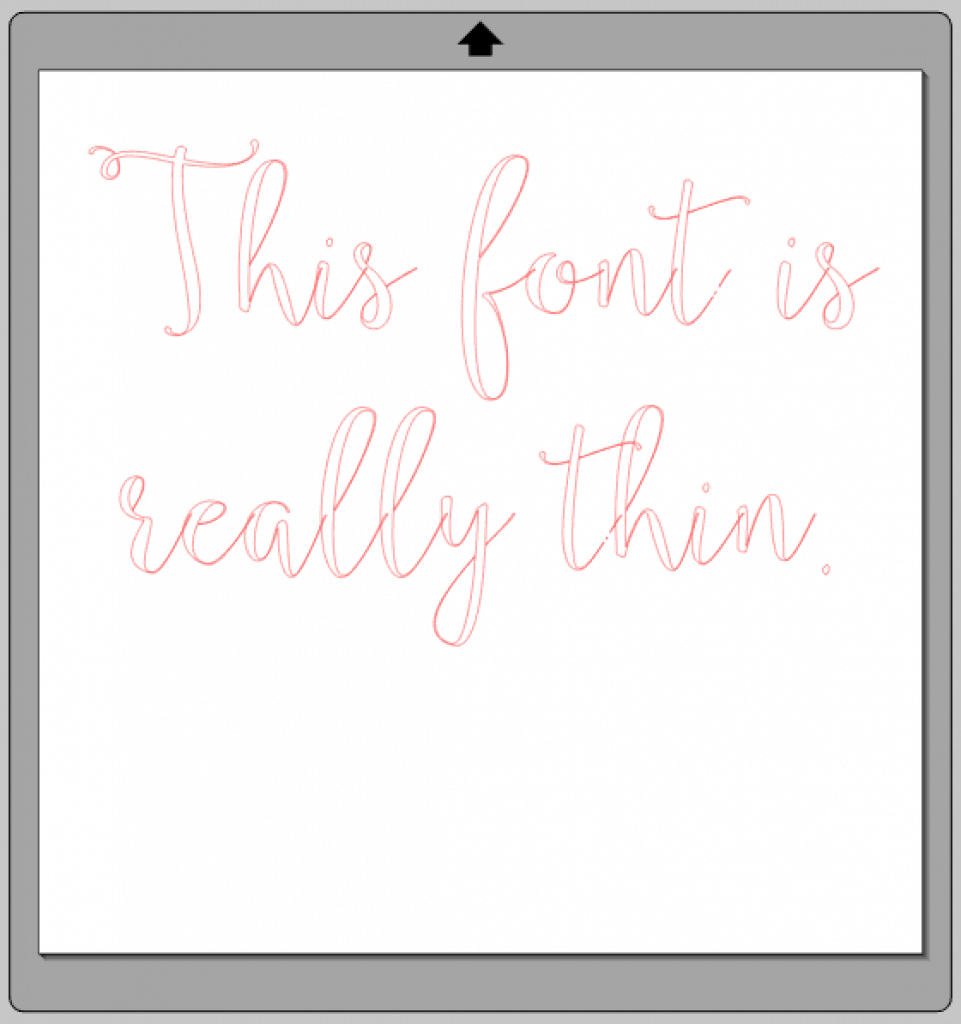
Here’s an example of a font that needs thickened to cut better in Silhouette Studio. If you are curious, this font is called Annabella and you can download it here.

2 Ways to Thicken Fonts in Silhouette Studio for cutting on Cameo or Curio - by cuttingforbusiness.com

How to Thicken Fonts in Silhouette Studio Using Offsetting

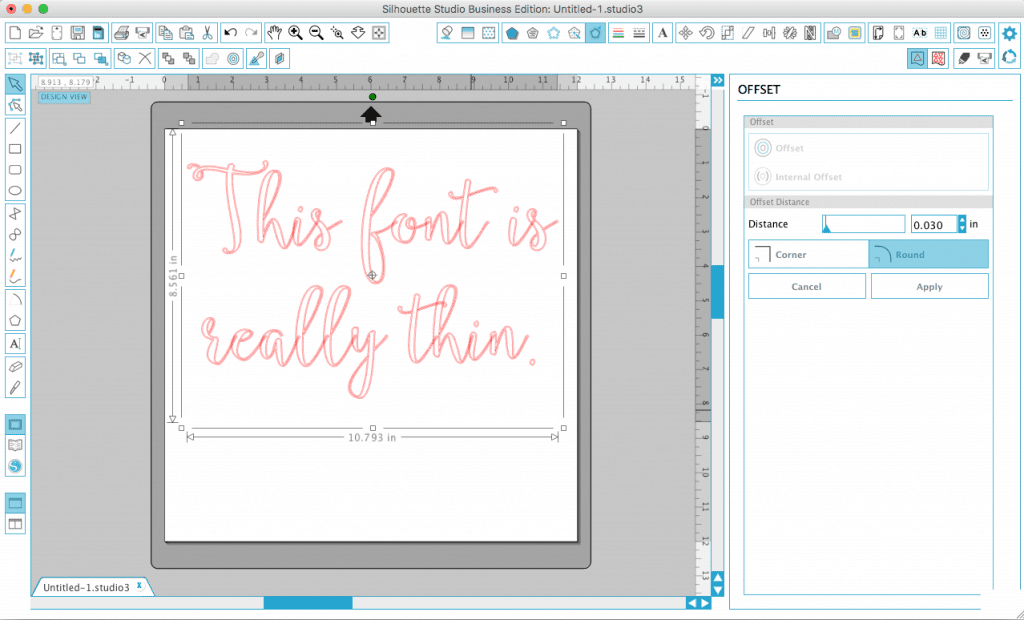
One way to thicken fonts is to use an offset. Here’s how:

  1. Within Silhouette Studio, navigate to the offset window.2 Ways to Thicken Fonts in Silhouette Studio for cutting on Cameo or Curio - by cuttingforbusiness.com
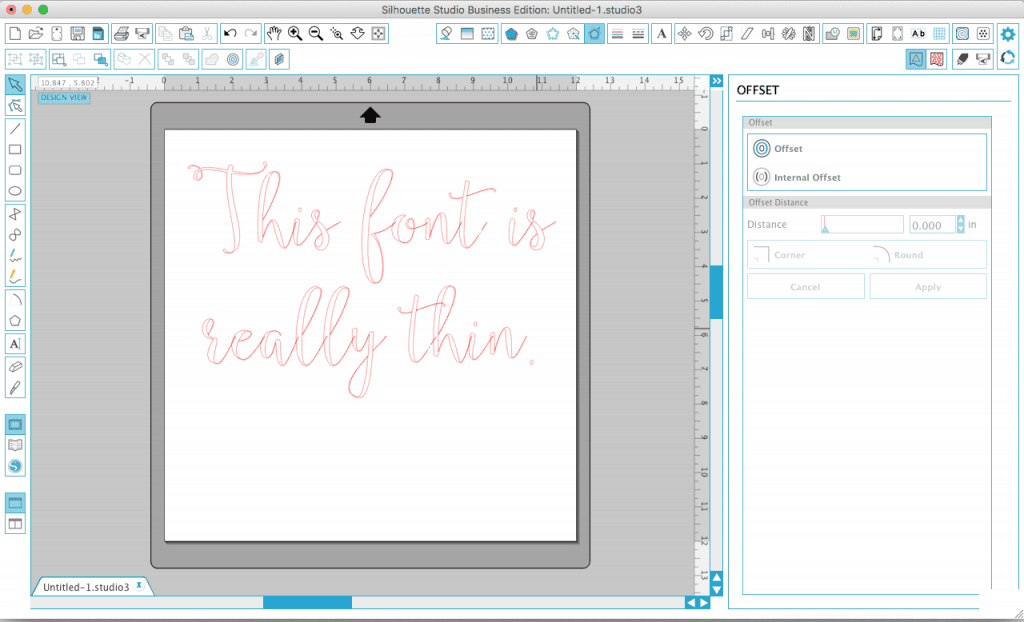
  2. Select your design and click “Offset”. 2 Ways to Thicken Fonts in Silhouette Studio for cutting on Cameo or Curio - by cuttingforbusiness.com
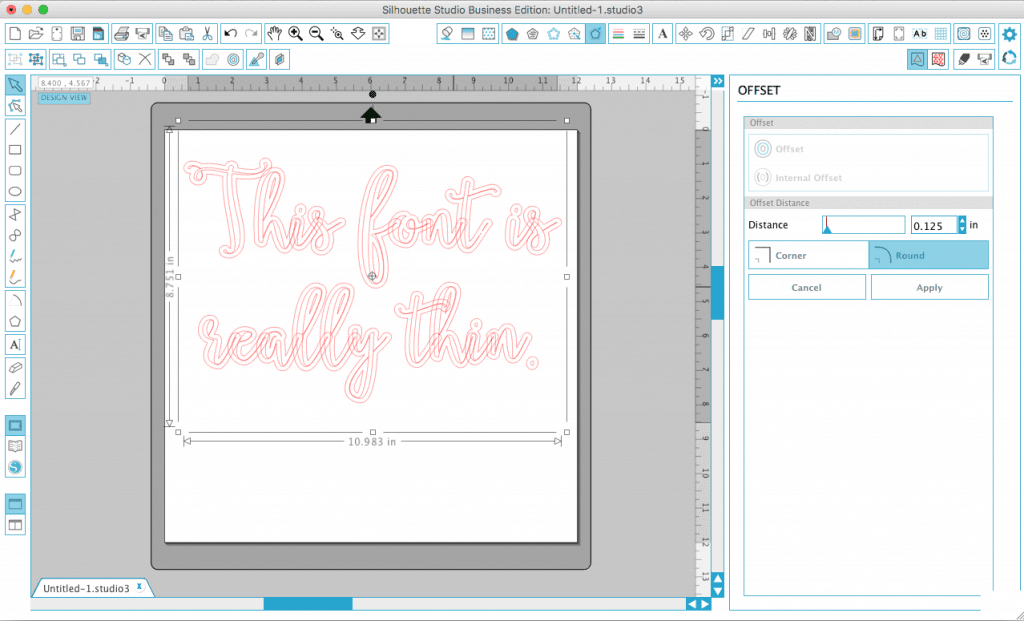
  3. Now, use the slider next to “Distance” to thicken the font. I usually offset by between .01 and .05, depending how thin the font is. Click “Apply” to confirm the change.2 Ways to Thicken Fonts in Silhouette Studio for cutting on Cameo or Curio - by cuttingforbusiness.com
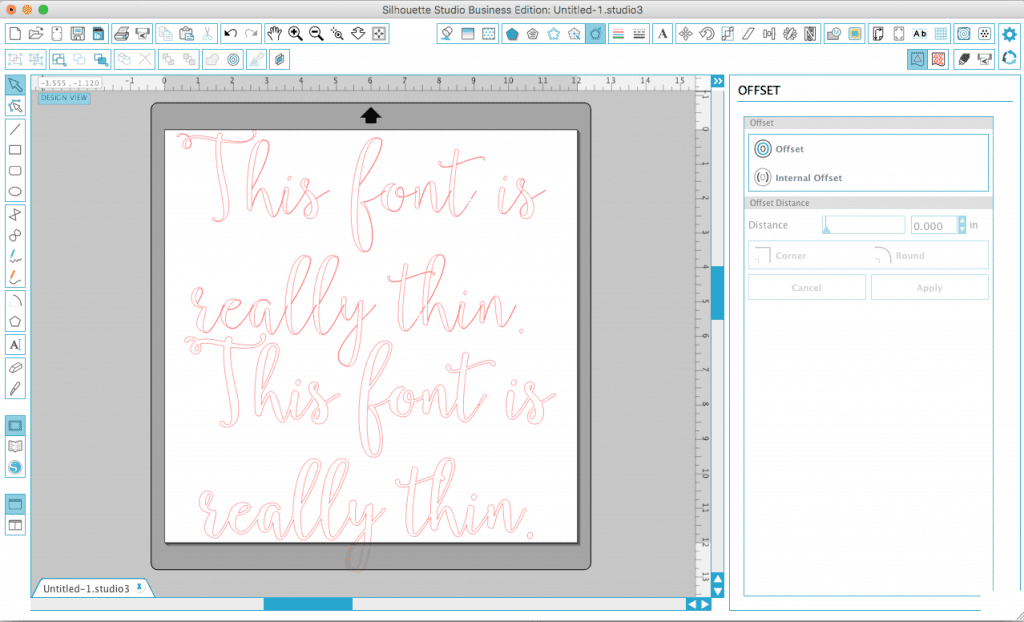
  4. You’ll now drag your newly offset design away from the original text and delete it. You’ll notice your new design is thickened up and will cut better on your Silhouette. (In the photo below, the top is the original and the bottom is the offset design.)2 Ways to Thicken Fonts in Silhouette Studio for cutting on Cameo or Curio - by cuttingforbusiness.com

Offsetting is great and commonly used, but I think there is an easier way!

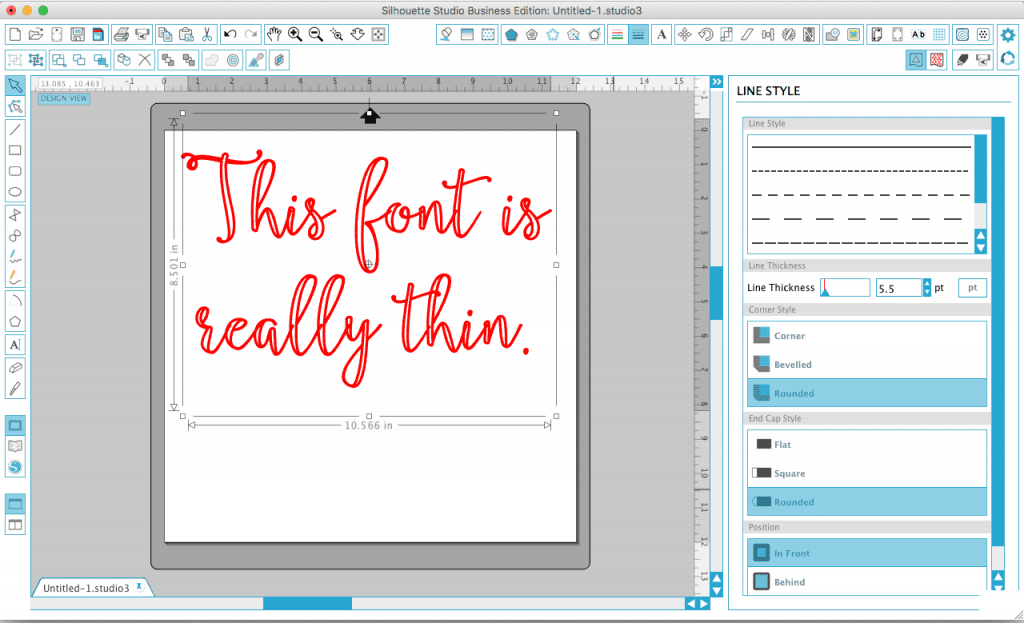
How to Thicken Fonts in Silhouette Studio Using Line Styles

  1. Starting with the same original design, you’ll navigate to the “Lines Styles” menu. 2 Ways to Thicken Fonts in Silhouette Studio for cutting on Cameo or Curio - by cuttingforbusiness.com
  2. This time, all you need to do to thicken your font is change the line thickness. 2 Ways to Thicken Fonts in Silhouette Studio for cutting on Cameo or Curio - by cuttingforbusiness.com
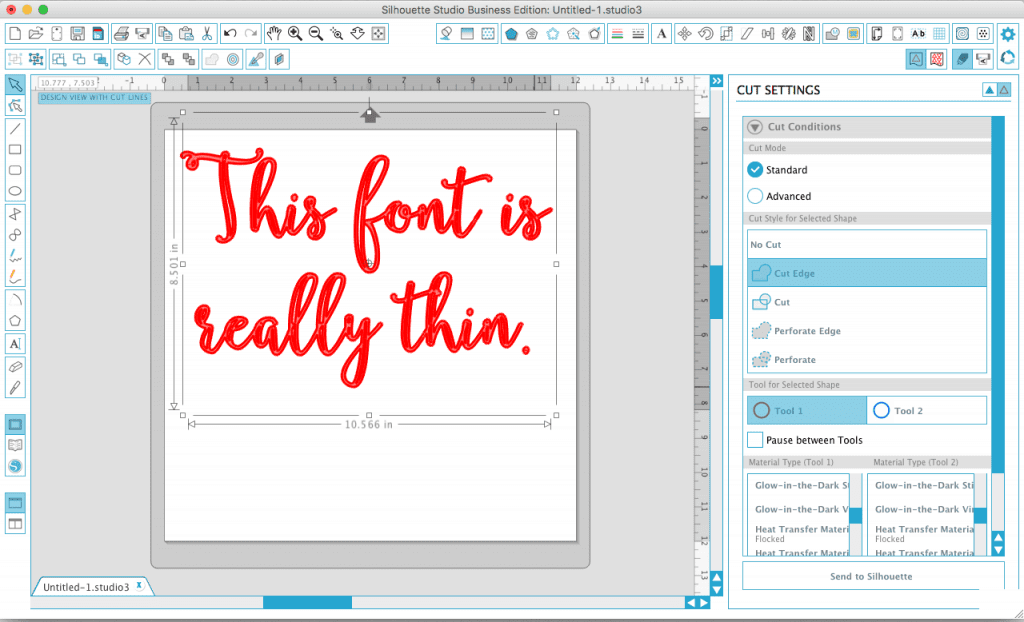
  3. When you are ready to cut, first fill the font with a color. Then you’ll choose the “Cut Edge” setting. 2 Ways to Thicken Fonts in Silhouette Studio for cutting on Cameo or Curio - by cuttingforbusiness.com

There you go – two ways to thicken fonts to make them easier to cut with your Silhouette. Remember, when you know how to work the software better; your small business will save time and do better.

Save this post to Pinterest:

2 Ways to Thicken Fonts in Silhouette Studio for cutting on Cameo or Curio - by cuttingforbusiness.com

Related Posts

  • Design Tutorial: Carved Initials Tree Trunk in Silhouette StudioDesign Tutorial: Carved Initials Tree Trunk in Silhouette Studio
  • Design with Me: Two Color Repeating Text DesignsDesign with Me: Two Color Repeating Text Designs
  • Tutorial: How to Make Cut Files with Dingbat FontsTutorial: How to Make Cut Files with Dingbat Fonts
  • Design Tutorial: Text Cut Out Designs in Silhouette StudioDesign Tutorial: Text Cut Out Designs in Silhouette Studio
  • Design Tutorial: Working with Text in Silhouette StudioDesign Tutorial: Working with Text in Silhouette Studio
  • Tutorial: How to Use iPad Pro as a Drawing Tablet in Silhouette StudioTutorial: How to Use iPad Pro as a Drawing Tablet in Silhouette Studio

Connect with Cutting for Business

  • Bloglovin
  • Facebook
  • Instagram
  • Pinterest

Get Cutting for Business in Your Inbox

Buy Books


Cutting for Business is a participant in the Amazon Services LLC Associates Program, an affiliate advertising program designed to provide a means for sites to earn advertising fees by advertising and linking to Amazon.com and affiliated sites. See the disclosures page for full disclosure information.


« Review: Square Contactless and Chip Reader
Free Valentine’s Day Heart SVG Cut File »

Comments

  1. Misty Kieschnick says

    January 19, 2017 at 8:22 am

    Brilliant! Thank you! I dont kniw why I hadn’t thought of the offset eature for this!!

    Reply
    • Christine says

      January 19, 2017 at 9:25 am

      My pleasure!

      Reply
  2. John in Philly says

    January 19, 2017 at 8:52 am

    I have used the offset to thicken fonts, but I never thought of changing line styles. Thanks!
    And I would suggest that before using either technique, you change the size of the text group close to what you want the end product to be. Because sometimes you will spent a fair amount of time offsetting the font, and then find out it does not look right when you scale it up or down.

    Reply
    • Christine says

      January 19, 2017 at 9:26 am

      Heeyyyaa stranger! Glad to see you on the blog! 🙂 Good point! 🙂

      Reply
  3. NikkiG says

    January 19, 2017 at 3:14 pm

    Great information. Any ideas on thickening fonts in design space?

    Reply
    • Christine says

      January 20, 2017 at 7:50 am

      If there is a way, I don’t know how to do it.

      Reply
    • Kay says

      January 20, 2017 at 8:12 am

      Nikki here is a workaround for Design Space. Clunky but at least possible https://www.youtube.com/watch?v=brnpMClWLpg&t=14s

      Reply
  4. Julie Marson says

    January 21, 2017 at 11:43 am

    Thank you for the lesson. I enjoy learning new techniques with my machine and it is so much easier when someone explains it to you with step by step instructions. Thank you again from someone who loves to learn something new everyday.

    Reply
    • Christine says

      January 23, 2017 at 8:10 am

      My pleasure!

      Reply
  5. Norma Middendorf says

    March 2, 2017 at 11:06 pm

    Thanks for the great information.

    Reply
    • Christine says

      March 3, 2017 at 12:17 pm

      My pleasure!

      Reply
  6. Jacqueline Gabriel says

    March 23, 2017 at 10:06 pm

    Thank you so much for this. I have several fonts on my Silhouette that can use thickening, Love your blogs!! Thanks for sharing

    Reply
    • Christine says

      March 24, 2017 at 8:37 am

      My pleasure!

      Reply
  7. Les says

    May 22, 2017 at 11:48 am

    Thank you so much! Very well written that even I COULD UNDERSTAND it! I’m a beginner and have lots of beautiful fonts but they are too thin for cutting. I’m the newly designated bulletin board person at work so I would like to put this silhouette and beautiful fonts to good use!

    Reply
    • Christine says

      May 22, 2017 at 8:05 pm

      That’s great! Don’t forget to search Pinterest for bulletin board ideas – there are a lot of them!

      Reply
  8. Carmela says

    June 13, 2017 at 10:58 am

    When you use the offset feature and drag it away from the original, which one are you deleting? The original or the offset

    Reply
    • Christine says

      June 13, 2017 at 1:10 pm

      You’d delete the original.

      Reply
  9. Stacy says

    January 21, 2018 at 11:28 pm

    So I am such a newbie. I just got my Silhouette Cameo 3 for Christmas. I just tried my first HTV. Haven’t gotten to the application part yet but I designed my font in Silhouette Suite and tried to use the Offset function. When I pulled my original from the widened design, it took all my insides with it so my zeros didn’t have the circles inside, my D, a, B, g, and e of my design all didn’t have the shapes that make it the letter. I also noticed, that even if the insides stayed, that the structure of the letters was lost so that it may have not been legible once it printed. Can Offset only be used with certain fonts or is there something I can do to fix this?

    Reply
    • Christine says

      January 22, 2018 at 8:59 am

      Generally, once you offset a font, you remove the original. It doesn’t sound like you did this.

      Reply
  10. Susie DeFrancesca says

    April 19, 2018 at 11:09 am

    I used the offset function and lost the interior part of the letters like O. It only outlines around the whole word? What am I doing wrong? I did move the script off and it was only the outter line>

    Reply
    • Christine says

      May 5, 2018 at 8:09 pm

      Correct, the offset function offsets the outside. After you do the offset, you’d remove the original and group all the parts back together.

      Reply
  11. ROSE VICENTE says

    September 3, 2018 at 5:34 pm

    Hi Christine
    Really need your expertise. I know you’re quite busy these days!! You are such a inspiration to all of us and love reading all of the things you post even if I don’t comment or remark every time..
    I am hoping others have the same or similar questions related to mine. I am finally started to use my Cameo 2 again after being for some unknown reason terrified of it for the past year. Yeah no idea why just a me thing!! Thanks to my husband who is building an Arcade, one of many things he’s doing and this is his first he needed some letters for his buttons. He begged me to try and do them for him. So I did and they came out great first print and my block was gone. Amazing how our husbands are able to make or break us. So glad mine is always willing to push me to my limits even though sometimes I’m not quite there yet. He’s always been a little more ocd than I will ever be but he knew that 40 years ago. He spends his time outside in his shop constantly building stuff he loves to make now that he’s retired. The Arcade is something he hopes to make into a future business maybe. We’ll see. Anyways he tries to keep me focused on things to do since we retired other than house or one of my favorites traveling, he so much more prefers being home, just us two. Back to my question sorry got a little track.
    Since getting all these fonts installed on my computer way back when, I now notice i have a few well many, I may never use ever. They don’t appear to be in my Cameo library so I can’t just delete them like I saw Melissa do on the Silhouette School page. Do you have anything that shows how to remove fonts and to be sure they’re not existing fonts that came with
    the computer so i like don’t mess up any existing hardware or software. This way I can add others I know I will truly use now that I am in my crafting mode and I actually and getting a better idea as to what fonts do and are. I am cleaning up my laptop and craft room to motivate myself more and often. Yes this past year he built me entire craftroom so I have no excuses. I need to get busy.

    Thank you much and we are keeping all of you in our thoughts and prayers. I just got a reprieve on my cancer stuff this year. My doctor says next year I just need to do blood work finally and if comes back good I won’t have to repeat all these special diets and testing maybe for a few years. Praying for good news for y’all too.

    Love
    Rose

    Reply
    • Christine says

      September 24, 2018 at 8:38 am

      Hi Rose! What a fun project – an arcade! It sounds like your husband is wonderful! I don’t have anything on specifically how to delete fonts. However, you wouldn’t delete them in Silhouette Studio – you’d need to delete them from your computer. If you are using an Apple computer, you’d delete them from Fontbook. For a Windows computer, here is a link to some instructions: https://www.online-tech-tips.com/computer-tips/install-delete-fonts-in-windows/. Hope that helps!

      Reply

Comments on Cutting for Business are moderated before posting. This ensures that this blog does not get overrun by spam or inappropriate comments. Please allow up to 7 days before you'll see your comment. Thanks, Christine

Leave a Reply Cancel reply

Your email address will not be published. Required fields are marked *

Make Money

Love to craft and ready to make some money? You're in the right place! Whether you own a Silhouette Cameo, a Cricut Maker, a Silhouette Curio, a Cricut Joy, or even a Glowforge, get tips and tricks to make an income with your machine.


Ready to Buy Craft Business Names


Free Fonts

Copyright © 2021 · Cutting for Business
Disclosures · Privacy Policy
This site is not affiliated with Silhouette America or Cricut (Provo Craft & Novelty, Inc.)

This website uses cookies to improve your experience. We'll assume you're ok with this, but you can opt-out if you wish. Cookie settingsACCEPT
Privacy & Cookies Policy

Privacy Overview

This website uses cookies to improve your experience while you navigate through the website. Out of these cookies, the cookies that are categorized as necessary are stored on your browser as they are essential for the working of basic functionalities of the website. We also use third-party cookies that help us analyze and understand how you use this website. These cookies will be stored in your browser only with your consent. You also have the option to opt-out of these cookies. But opting out of some of these cookies may have an effect on your browsing experience.
Necessary
Always Enabled

Necessary cookies are absolutely essential for the website to function properly. This category only includes cookies that ensures basic functionalities and security features of the website. These cookies do not store any personal information.

Non-necessary

Any cookies that may not be particularly necessary for the website to function and is used specifically to collect user personal data via analytics, ads, other embedded contents are termed as non-necessary cookies. It is mandatory to procure user consent prior to running these cookies on your website.