Selling on Etsy: Opening Your Shop (1/3)
Affiliate Disclosure: As an Amazon Associate I earn from qualifying purchases. Additionally, I may get commissions for purchases made through other affiliate links in this post.
Ready to take the plunge and start selling your Silhouette Cameo projects on Etsy? Great! The next three posts on Cutting for Business will walk you through how to set up an account, an overview of an Etsy listing, tidbits you’ll need to finish setting up, and an explanation of the fees to sell on Etsy. Before you begin, you’ll want to have photos of the first few items you will be selling.
1) Sign up for an Etsy account at Etsy.com. I’m happy to provide you 40 free listings to get you started on Etsy. If you’d like the free listings, use this link: Start selling on Etsy.com with an invitation for 40 free listings.
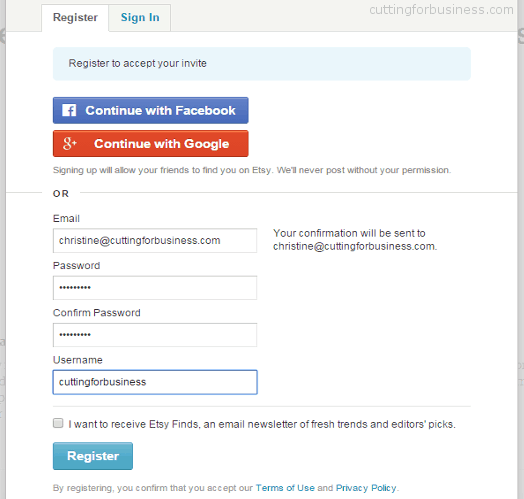
2) Next, you’ll click the “Open my Etsy Shop” and on the “Register” tab, you’ll fill in basic information – your email address, password, and username.
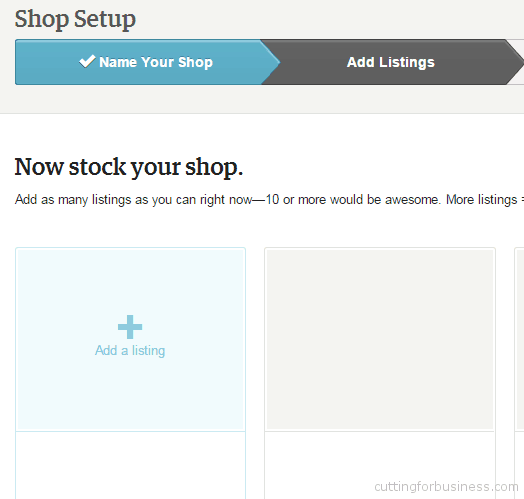
3) After registering, click “Open my Shop” once more. Etsy will ask you a couple easy questions, then it’s time to choose a name for your shop. If you are stuck, be sure to read my post on choosing a name for your business.
4) Next, you will start listing your items. Click the plus sign, “Add a listing”, to start.
5) Now, you’ll add the details for your listing. Here are some general notes about each entry, and be sure to read the tips Etsy provides on the right hand side.
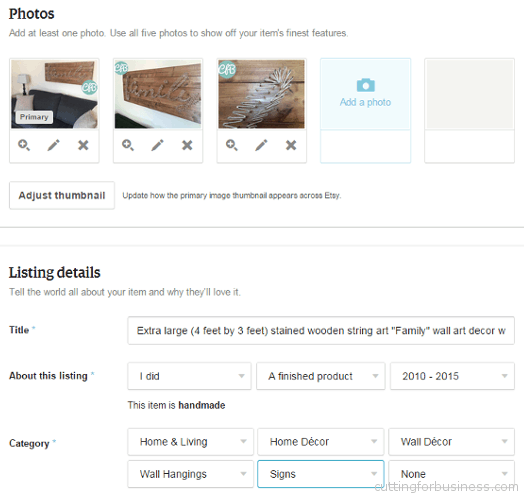
- Photos: Take photos of all sides of your item, as well as close up photos. Try to photograph items in natural light, and use staged photos or interesting backgrounds like scrapbook or bulletin board paper. Many of the top sellers have professional listing photos, which makes the competition on Etsy high. Put your best photo first, as Etsy will use it to showcase your listing on search pages or your shop page. Remember to watermark your photos.
- Write a descriptive title: In this example, I am listing a large wooden string art that I created with my Silhouette Cameo. Rather than simply write “Wooden string art wall decor”, I used more descriptive words and came up with the title: “Extra large (4 feet by 3 feet) stained wooden string art “Family” wall art decor word art”.
- About this listing: Be sure to choose accurate details from the drop menus, this helps Etsy categorize your item.
- Category: As you fill in the drop down menus, more will pop up. Fill them out as far as you can. Again, this helps Etsy categorize your item.
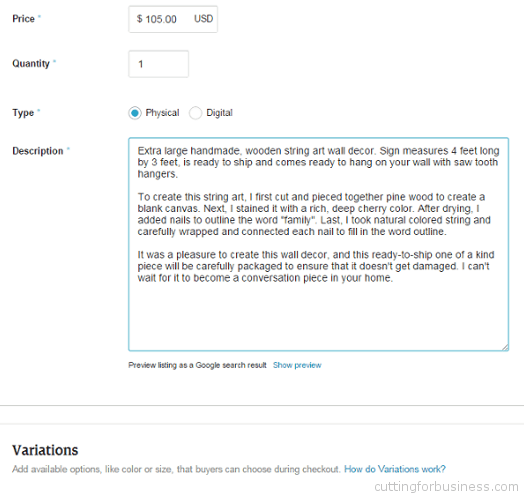
- Price: Be sure to price your item correctly. Read my post on pricing to get an idea of what costs should be figured into your selling price.
- Quantity: The number of the same item you have for sale.
- Type: Choose physical or digital. Physical items are items you ship or hand to a person; digital items are generally emailed.
- Description: Offer a long description of your item. Try to connect to your buyer and tell a story. Be a salesperson and tell them why this item is perfect for them, and even share how you created it. Optional: Some sellers offer their policies after their description such as shipping or store policies. I choose to not offer these details, as Etsy has a page available to place them (which is covered in the next post).
- Variations: Variations allow you to use one listing for items that come in different sizes or colors. In my wooden string art example, I could allow the customer to choose the color stain or the color of string to use. I would set this up using variations.
- Shipping: Choose your location and the cost to buyers to ship your item. Be sure not to guess here. The United States Postal Service has online shipping calculators to help you determine shipping costs. Read my post with shipping tips.
- Processing Time: How long before the item is ready to go? Enter it here.
- Tags: Etsy allows you to use 13 tags to help buyers find your item on Etsy. I suggest you use all of them! Think of words and phrases that potential buyers may use to find your item and enter as many as you can.
- Materials: Similar to tags, materials allows you to enter the items that you used to create the item

Once you are ready, click “Preview listing”.
6) Proofread the information you have entered and click “Save and continue”.
7) You can continue to add more items to your shop by going back to step 4 and entering the information for your next item. When you are ready to open your shop, click “Continue” in the bottom right hand corner.
8) Next, Etsy will ask you for information about your bank account and payment details. This allows Etsy to send you the money you earn from sales in your shop.
9) Last, click “Open Shop”. You’ll need to enter credit card information to allow Etsy to bill you their fees.
Hurray! Your Etsy shop is now open for customers to purchase items! There is still a few things that need to be done, read on to Part Two of this post.
Disclosure: In the event that you create an Etsy shop through my invitation to receive 40 free listings, I will receive free listings as well. This costs nothing additional to you, and helps keep my content on this blog free.
Since 2015, Christine Schinagl has been helping crafters start and run craft businesses through her blog, Cutting for Business. As a Silhouette and Cricut crafter herself, she has a unique take on what works and what doesn’t work in the craft business world. She also enjoys teaching other crafters how to create digital SVG designs, available through the Design with Me series.