Organizing Fonts with NexusFont
Affiliate Disclosure: As an Amazon Associate I earn from qualifying purchases. Additionally, I may get commissions for purchases made through other affiliate links in this post.
Let’s continue on with our discussion on fonts today. Yesterday I gave you resources for installing fonts onto your computer. As you collect more fonts, it’ll become tedious to click through each one to find a font that works well in your project. The three easiest ways I’ve found are using Fontbook (Mac users), Wordmark.it, and Nexus Font.
Quick Overview of Fontbook, Wordmark.it, and Nexus Font
Fontbook is built into Mac operating systems and makes looking at all installed fonts easy. If you use a Mac, Fontbook is the only resource you’ll need.
Wordmark.it is a website that shows you all of the fonts you have installed on your computer. Wordmark.it is great, but it doesn’t always load all the fonts you have on your computer, and it can be tedious when loading hundreds or thousands of fonts. Try out wordmark.it at this link.
NexusFont is my go-to resource for font organization. It is a free software program that can be installed onto your Windows based computer at this link.
NexusFont in Detail
NexusFont is easy to use:
- Type in the words or the phrase you will be using in your project.
- Scroll through all the fonts installed on your computer and choose the font you want to use.
- You can change the color of the fonts, the size, or style in the top right corner.
- This section includes information about your chosen font, including the creator.
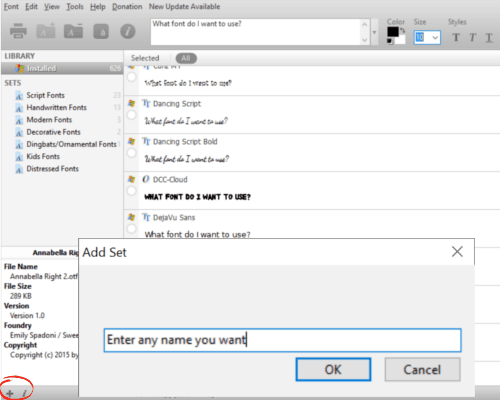
- Now, I only recently learned about this function. You can group your fonts into categories (called sets) that you create so that you don’t have to scroll through all of your installed fonts. For example, if you are creating a kids shirt you could look through all the fonts that you’ve grouped together as “Kids Fonts”. Or, you could separate your personal use from commercial use fonts.

5a. To create categories (a set) click on the plus button in the bottom corner, then enter any name you want for your category and click ok.
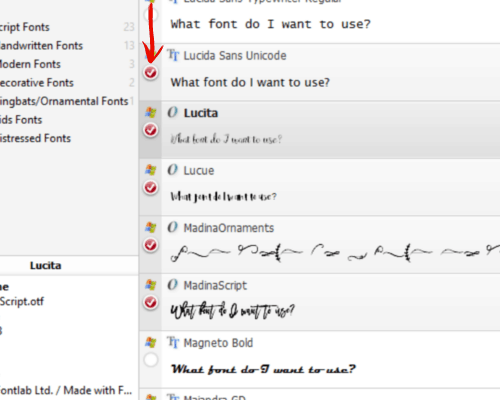
5b. Click the circle next to the font you want to add to your set and right click. From the menu that pops up, select “Add to Set”, then select the set.
That’s it! If this is an old trick and I’m the last one to find this out – why didn’t someone tell me sooner?!
Share this post on social media by hovering over the image below.
Since 2015, Christine Schinagl has been helping crafters start and run craft businesses through her blog, Cutting for Business. As a Silhouette and Cricut crafter herself, she has a unique take on what works and what doesn’t work in the craft business world. She also enjoys teaching other crafters how to create digital SVG designs, available through the Design with Me series.