• Home
  • Work with CfB
  • Contact
    • Bloglovin
    • Facebook
    • Instagram
    • Pinterest

Cutting for Business

  • New? Start Here!
  • Visit the Shop
    • Ebooks
    • Business Names
    • Craft Business Consultations
    • Order Forms
    • SVG Files
    • Etsy Shop
  • Join Craft Business Help
  • Must Have Products
  • Etsy Shop
  • Free Cut Files
  • Free Etsy Listings


Affiliate links may be present in the following article. For my full disclosure policy, see this link.
Additionally, as an Amazon Associate I earn from qualifying purchases.

Tutorial: How to Create Custom 3D Christmas Ornaments with Silhouette Alta

Filed Under: Silhouette Alta

I don’t know about you, but the last few months I have been having a blast with my Silhouette Alta! I went from never even seeing a 3D printer in person to being pretty proficient using my Alta.

Today I’m showing you how I designed and created a custom 3D printed ornament. I’ve broken it down step by step.

Note: This tutorial uses Silhouette Studio Business Edition and Silhouette 3D.

How to Create Custom 3D Christmas Ornaments with the Silhouette Alta

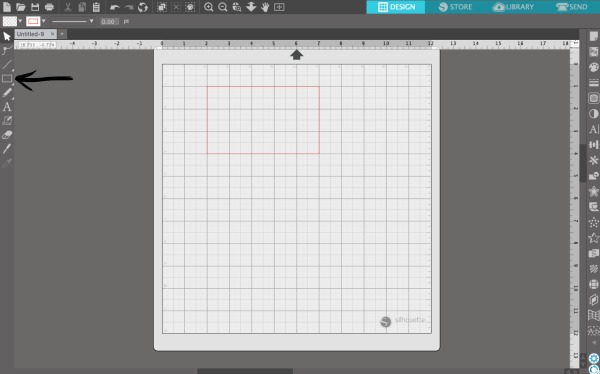
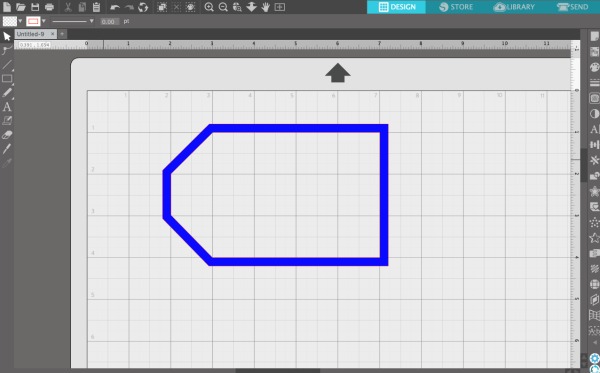
  1. Open Silhouette Studio and open a new blank mat. Draw a rectangle using the drawing tools. I sized mine at 5 inches by 3 inches. Tutorial: How to Create Custom 3D Christmas Ornaments with Silhouette Alta - by cuttingforbusiness.com
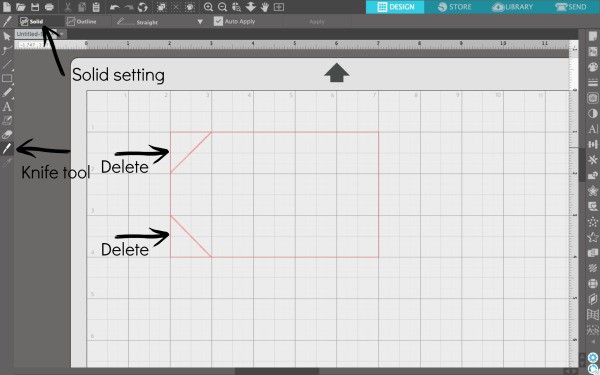
  2. Next, we need to make the rectangle look like a gift tag. Using the knife tool, slice off the two left corners. You’ll want to be sure that your knife setting is ‘Solid’. You can delete the triangle pieces. Tutorial: How to Create Custom 3D Christmas Ornaments with Silhouette Alta - by cuttingforbusiness.com
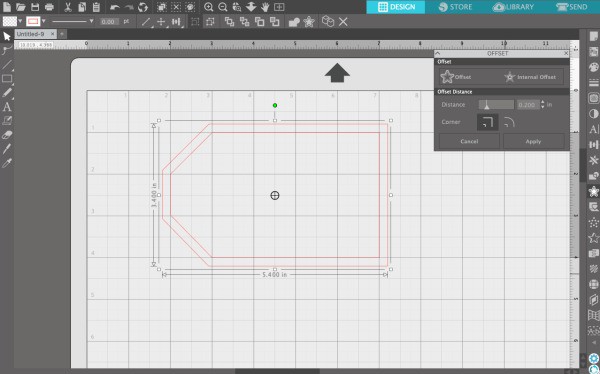
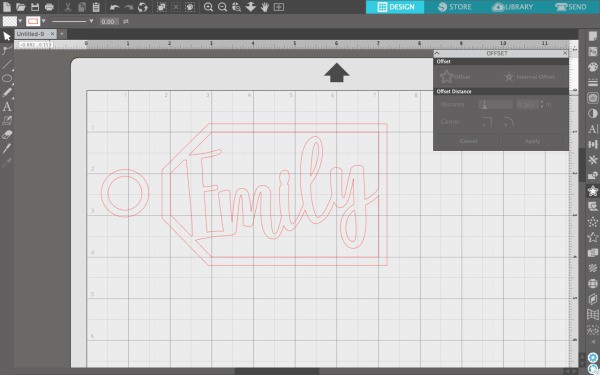
  3. Now, offset the tag shape you’ve created. I used an offset of 2.0, with sharp corners as seen in the screenshot below. Tutorial: How to Create Custom 3D Christmas Ornaments with Silhouette Alta - by cuttingforbusiness.com
  4. Right now, the shape is solid. We are going to want to make it hollow. Select both tag shapes, then navigate to ‘Object’, ‘Modify’, ‘Subtract’. Our tag is now hollow. If you want to check this, fill the tag with color as I have in the below screenshot. Tutorial: How to Create Custom 3D Christmas Ornaments with Silhouette Alta - by cuttingforbusiness.com
  5. Let’s personalize the ornament. Using a font of your choice, add a name inside the tag. I used this font. Tutorial: How to Create Custom 3D Christmas Ornaments with Silhouette Alta - by cuttingforbusiness.com
  6. Now, we need to make sure that all of the portions of the name touch each other. Right click on the name and select ‘Ungroup’. All of your letters will become separate. Tutorial: How to Create Custom 3D Christmas Ornaments with Silhouette Alta - by cuttingforbusiness.com
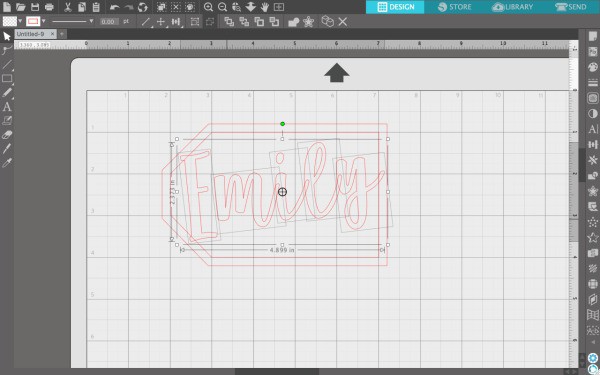
  7. Drag around the letters to make them all overlap each other. This ensures that when we print it, it is a one piece product. Be sure to overlap the letters onto the tag, too.Tutorial: How to Create Custom 3D Christmas Ornaments with Silhouette Alta - by cuttingforbusiness.com
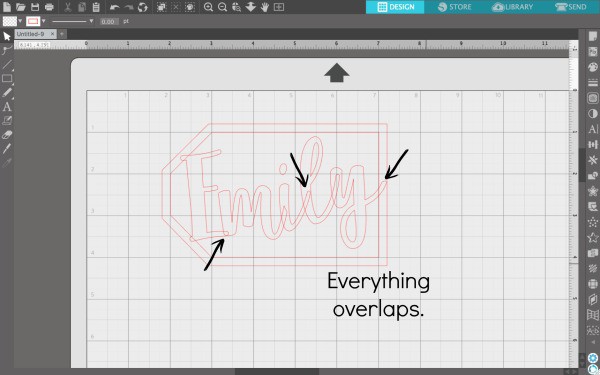
  8. Extra step: If you have letters with loose ‘pieces’ like the dot of the ‘i’ – there’s one more step you’ll need to do. Right click the letter and select ‘Release compound path’. This separates the ‘i’ and the dot. Move the dot so that it overlaps. Tutorial: How to Create Custom 3D Christmas Ornaments with Silhouette Alta - by cuttingforbusiness.com
  9. Navigate to ‘Edit’, then ‘Select All’. Right click and select, ‘Weld’. The ornament will become one piece. Tutorial: How to Create Custom 3D Christmas Ornaments with Silhouette Alta - by cuttingforbusiness.com
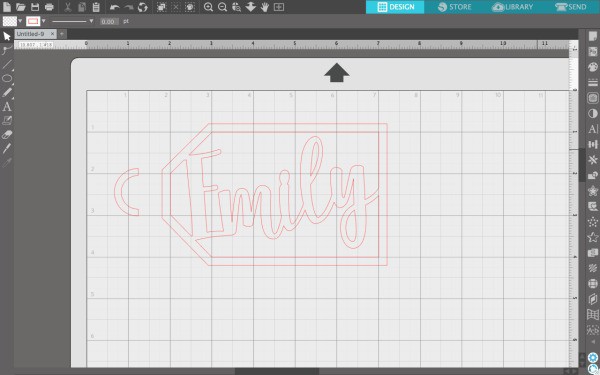
  10. One final step: Add a ring to hang the ornament from. Draw a circle and offset it like we did in step 3. Tutorial: How to Create Custom 3D Christmas Ornaments with Silhouette Alta - by cuttingforbusiness.com
  11. Subtract the inner circle from the outer (as we did in step 4). Then, slice it in half and delete the right half. Tutorial: How to Create Custom 3D Christmas Ornaments with Silhouette Alta - by cuttingforbusiness.com
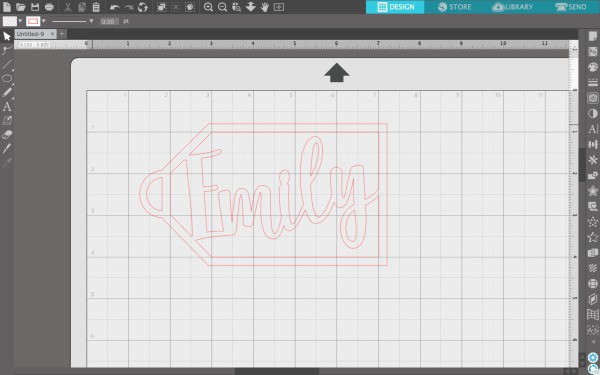
  12. Last, move your half circle over the tag and weld them together (as we did in step 9). Tutorial: How to Create Custom 3D Christmas Ornaments with Silhouette Alta - by cuttingforbusiness.com
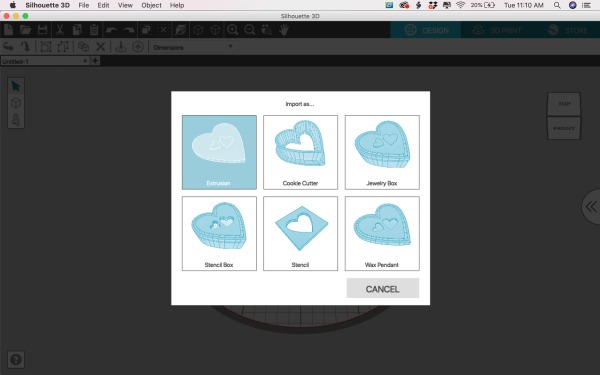
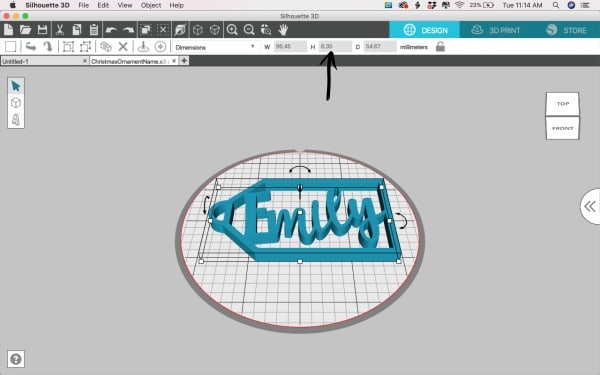
  13. Save the design to your hard drive. Now, open Silhouette 3D. You’ll import your design as an ‘Extrusion’. Tutorial: How to Create Custom 3D Christmas Ornaments with Silhouette Alta - by cuttingforbusiness.com
  14. Adjust the height of your ornament. I chose 0.25 inches – which translates to 6.35 mm. Adjust the size of your ornament if needed.Tutorial: How to Create Custom 3D Christmas Ornaments with Silhouette Alta - by cuttingforbusiness.com
  15. That’s it! Print it! I used this bronze PLA filament I picked up on Amazon a few months ago. I did not sand or do anything to finish the final ornament.

Tutorial: How to Create Custom 3D Christmas Ornaments with Silhouette Alta - by cuttingforbusiness.com

I couldn’t be happier with the finished product. Now, I’ve just got three more kids to make ornaments for!

Looking for more about the Silhouette Alta? Click here.

Did you enjoy this tutorial? Save the image below to Pinterest.

Tutorial: How to Create Personalized, Custom 3D Christmas Ornaments with Silhouette Alta

Related Posts

  • 15 Places to Find Free (and Cheap!) Files for Silhouette Alta15 Places to Find Free (and Cheap!) Files for Silhouette Alta
  • How to Price 3D Printed DesignsHow to Price 3D Printed Designs
  • 25+ Things to Print with a Silhouette Alta25+ Things to Print with a Silhouette Alta
  • 12 Things I Wish Someone Had Told Me About the Silhouette Alta12 Things I Wish Someone Had Told Me About the Silhouette Alta
  • FAQ: Silhouette Alta – What Is It and What Can It Do?FAQ: Silhouette Alta – What Is It and What Can It Do?
  • Does Using 3rd Party Accessories Void Your Silhouette or Cricut Warranty?Does Using 3rd Party Accessories Void Your Silhouette or Cricut Warranty?

Connect with Cutting for Business

  • Bloglovin
  • Facebook
  • Instagram
  • Pinterest

Get Cutting for Business in Your Inbox

Buy Books


Cutting for Business is a participant in the Amazon Services LLC Associates Program, an affiliate advertising program designed to provide a means for sites to earn advertising fees by advertising and linking to Amazon.com and affiliated sites. See the disclosures page for full disclosure information.


« Free Printable: USPS Christmas Holiday Shipping Deadlines 2018
Free Christmas ‘If You Stop Believing in Santa, You’ll Get Socks’ SVG Cut File »

Comments

  1. Athena says

    November 28, 2018 at 3:03 pm

    Even easier instead of subtracting your offsets, right click and click make compound path. It achieves the same result but seems to not bog down the software as much! I used to use subtract for this as well but make compound path makes it much much easier and quicker!

    Reply
    • Christine says

      December 7, 2018 at 1:46 pm

      Thanks – I’ll have to try that out!

      Reply

Comments on Cutting for Business are moderated before posting. This ensures that this blog does not get overrun by spam or inappropriate comments. Please allow up to 7 days before you'll see your comment. Thanks, Christine

Leave a Reply Cancel reply

Your email address will not be published. Required fields are marked *

Make Money

Love to craft and ready to make some money? You're in the right place! Whether you own a Silhouette Cameo, a Cricut Maker, a Silhouette Curio, a Cricut Joy, or even a Glowforge, get tips and tricks to make an income with your machine.


Ready to Buy Craft Business Names


Free Fonts

Copyright © 2021 · Cutting for Business
Disclosures · Privacy Policy
This site is not affiliated with Silhouette America or Cricut (Provo Craft & Novelty, Inc.)

This website uses cookies to improve your experience. We'll assume you're ok with this, but you can opt-out if you wish. Cookie settingsACCEPT
Privacy & Cookies Policy

Privacy Overview

This website uses cookies to improve your experience while you navigate through the website. Out of these cookies, the cookies that are categorized as necessary are stored on your browser as they are essential for the working of basic functionalities of the website. We also use third-party cookies that help us analyze and understand how you use this website. These cookies will be stored in your browser only with your consent. You also have the option to opt-out of these cookies. But opting out of some of these cookies may have an effect on your browsing experience.
Necessary
Always Enabled

Necessary cookies are absolutely essential for the website to function properly. This category only includes cookies that ensures basic functionalities and security features of the website. These cookies do not store any personal information.

Non-necessary

Any cookies that may not be particularly necessary for the website to function and is used specifically to collect user personal data via analytics, ads, other embedded contents are termed as non-necessary cookies. It is mandatory to procure user consent prior to running these cookies on your website.

SAVE & ACCEPT